Most pictures may be clicked to enlarge.
Since the last tutorial on using Excel for pattern writing, I've refined a lot of how I manage my spreadsheets. I've been playing around with different formulas in Excel to find ways to make pattern writing easier. You know what that means, another tutorial.
Download the spreadsheet and play along at home. I'll be making references to various parts of the spreadsheet so go ahead and open this baby up.
NOTE: The attached spreadsheet is just a sample and contains measurements that may be useful but which may not meet the standards for some publications. You are welcome to use what I have for your own design purposes but it'll be you who has to ultimately support any patterns written from it, so do your research first.
Special notes:
I've used Ysolda's measurement chart as a reference for many of the basic sloper measurements.
I'm using Amy O'Neill Houck's tutorial on estimating yardage to create my yardage estimation formulas.
The goal
So, like last time, I'm just giving you instructions for a basic shell. All the same formulas can be used to build sleeves. Just use this as a starting point.

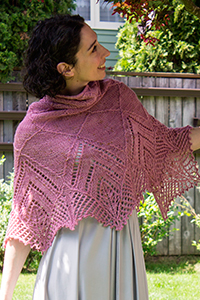
A rough schematic of what we are shooting for
In this tutorial, we're going to learn about:
In future tutorials, we'll look at:
- Evenly spacing shaping
- Every X rows Y times
- Next and every X rows Y times
- Intro to IF statements
- Calculating finished garment measurements
- Calculating yardage based on a sample
- Putting your numbers into MS Word
Sounds like more fun than a root canal, huh? Well, once you get the basic premise of these options, you'll be able to put them in a template and copy and paste them as needed. All of the formulas I'll discuss are in the spreadsheet, so you can see them in action, which is always more helpful than seeing them out of context.
The spreadsheet
The spreadsheet has 4 distinct sections.

The whole spreadsheet
Upper left is where you insert your gauge, ease, body shaping and multiples+, if necessary. I've set up the cells with names, as covered in the previous tutorial. This allows you to quickly apply calculations across all sizes |
The pink sections are your body and garment measurements On the right, with the purple headers, are the conversions to stitches |
On the left, with the orange headers, are the raw calculations. On the right, under the green headers, are the rounded calculations. |
The bottom of the document contains areas for calculating the final measurements (in and cm) of the garment based on your actual stitch and row counts. This is a great sanity check for your pattern and can show you where you may have made an error in your pattern calculations. This is also very useful for building your schematic. Below the measurements are calculations for yardage and skeins for each size. |


Rounding
For the most part, I use rounding to give me whole numbers based on my raw calculations. No one can cast on 34.583 stitches, they need some real numbers to work with. By using MROUND* to convert my calculations, instead of simply hand keying the closest whole number in, I can have the numbers automatically update on the fly, if I go back and change something in the Sloper/Garment Measurements section of the document.
*NOTE: Round can be used the same way, if you prefer.
Round to a whole number
MROUND is used as follows:
= MROUND(ValueToRound, MultipleToRoundTo)
So, if we look at row 45 of the spreadsheet
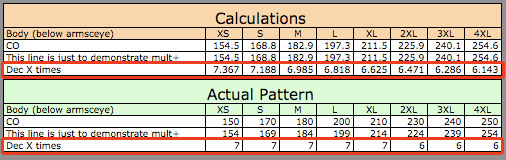
Row 45 indicates to Dec X number of times. I have stacked the two sides vertically so you won't need to scroll right and left to see it.
The values under the orange header are decimals. To get the rounded values under the green header, I use MROUND as follows.
For size XS
=MROUND(C45,1)
| Formula element | Reason |
| = | Indicates a formula |
| MROUND | Round to the nearest multiple |
| ( ) | Value and multiple must be in parenthesis |
| C45, | The cell we are rounding. Any number or formula can be placed here. Formulas must be in their own parenthesis inside the existing parenthesis. |
| 1 | The multiple to which we want to round. This can be any value. |
Round to an Even or Odd number or Round Up or Down
Sometimes, you don't want to round to a particular multiple, you want an even or odd number. We'll look at an example of this in an upcoming tutorial. You can see it in action on row 73 of the spreadsheet. Use the command as follows.
=EVEN(value)
=ODD(value)
| Formula element | Reason |
| = | Indicates a formula |
| EVEN (or ODD) | Indicates you want the closest EVEN (or ODD) number |
| ( ) | Value should be in parenthesis |
| value | Any number or formula can be placed here. Formulas must be in their own parenthesis inside the existing parenthesis. |
Alternately, you could simply round, round up or round down. We'll be using these functions when we calculate shaping intervals. You can see ROUNDDOWN on row 47 of the spreadsheet. Round (up/down) is used to round to a particular decimal point. To round to a whole number, use zero as the second number. To use these options, the formulas are as follows:
=ROUND(value, DecimalToRound)
Rounds to the closest number to the designated decimal place=ROUNDUP(value, DecimalToRound)
Rounds up to the to the indicated decimal place=ROUNDDOWN(value, DecimalToRound)
Rounds up to the to the indicated decimal place
| Formula element | Reason |
| = | Indicates a formula |
ROUND(UP /DOWN) |
Indicates that you want to round(up/down) to a particular decimal place. |
| ( ) | Values should be in parenthesis. Any number or formula can be placed here. Formulas must be in their own parenthesis inside the existing parenthesis. |
| value, | Any number or formula can be placed here. Formulas must be in their own parenthesis inside the existing parenthesis. |
| DecimalToRound | How many decimal places you wish to round. Zero value will give you a whole number |
For example, on row 47, size XS, we have the following formula
ROUNDDOWN((M46/M45),0) which takes the raw value of 5.463537906 and gives us 5
Rounding to a multiple (other than 1)
Going back to MROUND, we can use the pattern multiple we set up at the top of the document

This pattern is done in a multiple of 5 plus 4. Multiple has been named "mult" and the plus has been named "plus".
Looking at our cast on row, 43, we are knitting in the round. Plus stitches are used for flat knitting, so we won't need that. Since we are knitting the front and back, we want to double the multiple.
For the XS size, my raw calculations say to cast on 154.5 stitches (cell C43). For my final calculations I'll use the following formula
=MROUND(C43,(mult*2))
| Formula element | Reason |
| = | Indicates a formula |
| MROUND | Rounding to a multiple |
| ( ) | Value should be in parenthesis. Any number or formula can be placed here. Formulas must be in their own parenthesis inside the existing parenthesis. |
| C43, | Cell we are rounding |
| (mult*2) | Rounding to the closest number that is a multiple of 5 x 2 |
Our final value (cell M43) is 150 stitches which is a whole number that is divisible by double our multiple.
Round to a multiple plus
To round to the closest multiple plus (mult of 5 +4) we need to add a few extra elements. It looks complicated but I'll break it down for you so it makes more sense.
=(MROUND((C43-plus), mult))+plus
| Formula element | Reason |
| = | Indicates a formula |
| MROUND | Rounding to a multiple. We're putting the MROUND formula, itself, in parenthesis because we'll need to add the plus amount at the end. |
| ( ) | Value should be in parenthesis. Any number or formula can be placed here. Formulas must be in their own parenthesis inside the existing parenthesis. |
| (C43-plus), | In another set of parenthesis, we put the value we are rounding and subtract the plus amount since we know we'll be adding it again later. |
| mult) | The multiple amount |
| +plus | Add the plus amount to the rounded number. |
Our final value (cell M44) is 154, which is a multiple of 5, plus 4 additional stitches.
In closing.
This tutorial covered all different sorts of rounding options. The spreadsheet shows you the ways I use them, but you might be able to find innovative ways to use these same formulas in your own spreadsheet.
I plan to cover the remaining topics in upcoming tutorials. Feel free to leave a note if you have any recommendations for people using this tutorial or if you have any requests for future topics
And keep in mind that these are just suggestions. I'm neither an Excel expert nor a skilled mathematician and there are probably a dozen other ways to go about getting accurate results. Don't be afraid to follow your intuition and change the formulas, if you think there's a better way.

This is awesome! I can't wait to check it out. Thanks so much for sharing.
More dogs, less knitting.
Thanks for putting up this tutorial! My current method involves a notebook, pencil, and eraser.
I am in awe. What a wonderful system. I have always wondered what measurements were the basis for the various sizes, and now I know.
Thank you for sharing this. You've put a lot of hours into it and this is a valuable resource.
Kim
you are so generous!
Uh.... *thud*. My jaw just dropped. You are awesome.
You are so generous to share this! I can't wait to chart out something! :)
Marnie,
You are so awesome, it's wonderful to see some technical expertise and the power of Excel used to demystify and bring the designing of sweaters down to a level where anyone can use it! Thanks for sharing this with us!
Bea
whoa, mad skillz
this is great. thanks so much. you're awesome.
Um, my mouth is wide open (and unattractively so, I might add). Thanks so much for sharing even more of your design tricks of the trade with us. "Generous" doesn't even begin to describe what you are. Incredible, truly.
Hi Marnie--thanks so much for the amazing tutorial! I'm looking forward to trying this out, as I usually do a lot with pen, paper and calculator. Thank you for linking to my tutorial! You may want to change the link to my new blog: http://www.thehookandi.com/2007/03/18/down-to-the-yard/
because eventually the blogspot one will go away.
Cheers,
Amy