Copyright Marnie MacLean 2003
Click on Images for Larger View
Gauge
21 stitches by 30 rows = 4"
Materials
- #8 circular needles
- 4 skeins of Papyrus in color of choice
- 4 stitch markers
- Stitch holders or scrap yarn
- Less than 1 skein of cotton crochet thread in size 10
- Size 7 steel crochet hook
- Assortment of metal and glass beads (Available through local craft store)
- 1/4" waistband elastic, or .5mm elastic line if desired
Yarn Substitution
Papyrus is a 100% cotton ribbon yarn. Any worsted weight yarn should work, though the fabric may have a slightly different hand.
Stitches Used
Knit:
- Stockinette Stitch (STst)
- 1x1 Ribbing
- Yarn Over (YO)
- Slip (sl)
- Knit two together (k2tog)
- Decrease (dec)
- Increase (in)
Crochet:
- Slip Stitch (sl st)
- Single Crochet (sc)
- Double Crochet (dc)
- Chain (ch)
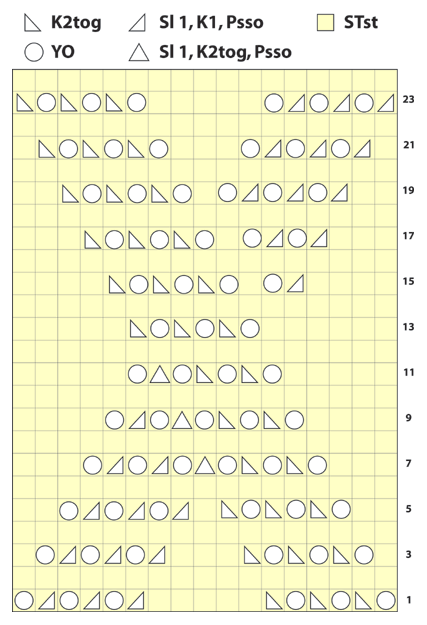
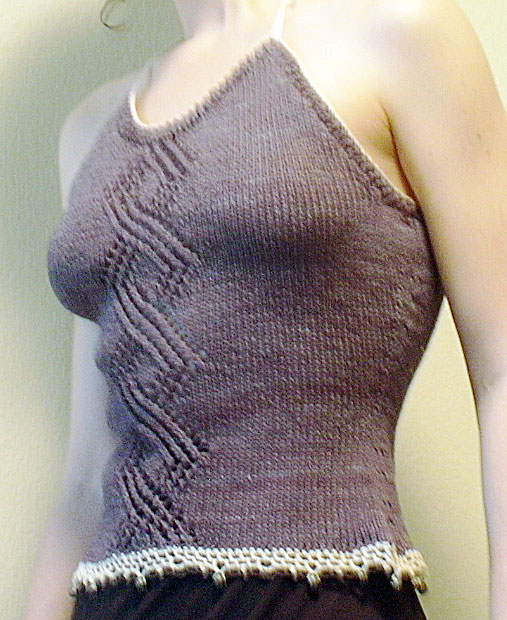
Lace Diamonds Pattern
worked as follows
 Main
Body:
Main
Body:
Size written for women's size small (Medium and Large in parenthesis)
CO 174 (186, 210) on size #8 knitting needles
Place stitch marker between first and last stitch and one after 87th (93rd, 105th) stitch to mark side seams.
At center front, use stitch markers to indicate the 17 centermost stitches, where the diamond pattern will be worked. Lace is worked from the first row, up the entire front of the piece until noted.
Work even for 2 rows
Decrease before and after each side seam stitch-marker next row and then every 6th (14th, 14th) row 4 (2, 2) times.
Work even for 10 (8, 4) rows
Inc one st before and after each side seam stitch-marker next row and then every 6th (6th, 8th) row, 7 (7, 6) times.
Work even for 14 rows
Place back stitches onto a stitch-holder or scrap yarn. You will now be working only the front, and will knit back and forth instead of circularly. Remove side seam stitch-markers but keep markers for lace.
BO 7 (7, 8) stitches at beginning of next 2 rows
Armhole shaping:
Begin armhole decreases noting that neck will be started at row 36 (38, 40) *Dec 1 st at each armhole end of every 3rd row 18 (16, 12) times
Then dec 1 st at each end of every 2nd row 4 (9, 16) times*
Work from * to * for a total of 36 (38, 40) rows (With 58 (65, 71) stitches remaining) and then begin neck shaping at SAME TIME
Neckline:
Work 21 (24, 26) st, move 16 (17, 19) stitches to stitch-holder, work remaining 21 (24, 26) st with second ball of yarn.
While continuing armhole shaping, Dec 1 st on neckline side every row 8 (9, 9) times, until 10 (12, 12) st remain. Continue working armhole dec until 2 st remain.
BO
Ribbing:
With right side facing PU and knit 68 (72, 75) st from left armhole, all st from back, and 68 (72, 75 st from right armhole.
Along armholes dec from 68 (72, 75) to 48 (52, 53) st , working back straight.
Work 2 rows of K1, P1 ribbing
BO
With crochet thread sc in each st around, working 3 sc at the two top neckline points.
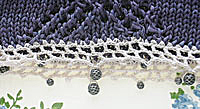 Bottom
Lace:
Bottom
Lace:

Using crochet thread, string about 30 beads onto thread. You probably won't need them all but it's harder to add beads than it is to have some you don't use.
Row 1: 2 sc in each st, sl st in first sc.
Row 2: Ch5, sk 2 sc, *dc in next sc, ch2, sk 2 sc* around. Sl st into 3 ch of original ch5.
Row 3: Ch4, *dc into next sp, ch2, slide first bead down and sc on the other side of it to secure, ch2, dc in next sp, ch2, dc in next sp, ch 5, sl in 3rd ch from hook, ch2, dc in next sp, ch2* repeat from * around, closing with sl st in 3rd ch of original ch5.
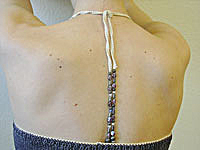 Ties.
Ties.

Sc into top right neckline point. Ch 91.
Sc in every ch, sl st into point.
Sc in every sc.
Cut long tail and tie off.
Thread beads onto tail. Skipping last bead, weave thread back through all beads and secure.
Repeat on other side.
Final note:
You may want to use 1/4" waistband elastic along inside of ribbing to keep top from sagging and to give a little more support.
Thank you so much for your interest in my patterns. Most of my free patterns were efforts to learn to design and do not conform to industry standards for sizing or terminology. Enough people continue to knit from these designs that I am happy to leave these patterns up for people to use but I cannot offer any amendments or substantial support for them.
As with all my patterns, you are welcome to use these patterns for your own personal, non-commercial or charitable use. If you wish to sell items made from these patterns or teach classes using my patterns, please contact me. Please do not distribute this pattern in print or electronically or post this pattern to your own site or publication. If you wish to share this pattern, please send the person a link to my site.