Copyright Marnie MacLean 2004
Click on Images for Larger View

Supplies
2 Skeins of Catnap in
Green for small or medium, 3 for large
1 Skein of Catnap in
Purple
US #10.5 needles
US#9 needles
G Crochet hook
Tapestry Needle
10" Separating zipper
36" Shoe lace or other tie for hood
Yarn substitution
Cat nap is a chenille like, microfiber yarn. I have knit this piece with TLC Amore with good results. Most worsted or aran weight yarns will work fine for this piece, just remember to choose something machine washable.
Gauge
15.0 sts by 20.0 rows = 4" in STst
Body
 Download
the PDF chart for the size you wish to work. Please refer to the key at right
for the various stitches.
Download
the PDF chart for the size you wish to work. Please refer to the key at right
for the various stitches.
You can work the spots as intarsia, as you go, or work them as appliques separately.
The piece shown uses appliques.
All hems are worked on the smaller needle size. All green areas and spots are
worked with size #10.5 needles.
Small: Chest=21" Length=10"
Body and Sleeve Chart
Hood Chart
Medium: Chest=23" Length=10.5"
Body and Sleeve Chart
Hood Chart
Large: Chest=25" :Length=11"
Body and Sleeve Chart
Hood Chart
Notes about working the Hood
Please note that the purple area of the hood has indications for a YO, K2tog at each end to produce holes for the tie to be threaded and will need to be folded in half and grafted together to make the casing.
Assembly
Sew front and back of sweater together at side seams and shoulder seams.
Sew sleeves onto body.
Sew up seams of the hood but do not attach to body yet.
Front Placket
With #9 needles, PU 3 stitches for every 4 rows along right front side.
Work in Seed Stitch for 4 rows.
BO
Repeat on left side.
Attach hood to body at neckline
Ears
With #9 needles CO 3
Increase at both ends of every row for 3 rows
Work 2 rows straight
Decrease at both ends of every row until you have 1 stitch left.
BO
Make 2
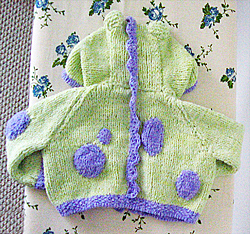 Spine
Spine

With crochet hook, make a chain a few inches longer than desired length of spine. Ch1, turn
*SC in next ch, HDC in next ch, 3 DC in next ch, HDC in next ch* To desired length. Undo any remaining chain stitches, by cutting the chain within an inch of the last bump and unraveling the remaining couple chains.
Finishing
Attach ears to top of hood seams.
Sew spine along center back from bottom hem to top of hood.
If you worked the spots as appliques, attach them as outlined in the chart.
Sew zipper into place.
Thread shoelace through YO eyelets in hood.
Thank you so much for your interest in my patterns. Most of my free patterns were efforts to learn to design and do not conform to industry standards for sizing or terminology. Enough people continue to knit from these designs that I am happy to leave these patterns up for people to use but I cannot offer any amendments or substantial support for them.
As with all my patterns, you are welcome to use these patterns for your own personal, non-commercial or charitable use. If you wish to sell items made from these patterns or teach classes using my patterns, please contact me. Please do not distribute this pattern in print or electronically or post this pattern to your own site or publication. If you wish to share this pattern, please send the person a link to my site.