Copyright Marnie MacLean 2004
Click on Images for Larger View
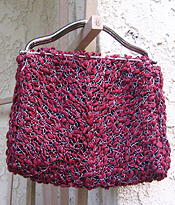
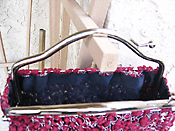
 This
piece was surprisingly hard to name. The yarn defies easy description. It's
a mix of stainless steel and cotton, a combination sure to surprise. When laid
flat, the piece looks dense and organic, but held up to the light, the effect
is almost lacelike. Perhaps one sees the silhouettes of leaves in a tree canopy
in autumn, or, as the name of this purse suggests, rose buds weaving in and
out of chain link. Others still, see rare and lovely rubies cut and set as
cabochons, while others see blood. Because of it's complex nature, the yarn
really asks to be the focal point on it's own. The pattern is simple and easy
to adapt to different sizes, but I do recommend that you splurge on a proper
purse handle. Many knit purses end up too droopy and floppy to stand up to
normal usage. A purse handle gives a more professional touch.
This
piece was surprisingly hard to name. The yarn defies easy description. It's
a mix of stainless steel and cotton, a combination sure to surprise. When laid
flat, the piece looks dense and organic, but held up to the light, the effect
is almost lacelike. Perhaps one sees the silhouettes of leaves in a tree canopy
in autumn, or, as the name of this purse suggests, rose buds weaving in and
out of chain link. Others still, see rare and lovely rubies cut and set as
cabochons, while others see blood. Because of it's complex nature, the yarn
really asks to be the focal point on it's own. The pattern is simple and easy
to adapt to different sizes, but I do recommend that you splurge on a proper
purse handle. Many knit purses end up too droopy and floppy to stand up to
normal usage. A purse handle gives a more professional touch.
The added benefit to using Tesla is that the cotton and stainless steel not only looks stunning, but it makes for a strong and sturdy purse. Those of you with great sewing skills should consider making a proper lining, but for those with more basic sewing skills, this pattern is sure to be within your skill set.
Gauge:
Working 45 stitches in a bias pattern (described below) should be about 7.5"-8" wide. The final piece will be a little wider in front but will be cinched in by the purse frame.
Supplies:
- 2 skeins of Tesla yarn (Cotton and Stainless Steel) in color of choice
- 1 pair of US #10.5 straight needles
- 1 stitch marker
- Tapestry needle
- 1 Purse frame. I bought mine here, item # LV62
- One way stretch fusible interfacing in black (optional)
- Black grosgrain ribbon (optional)
- Sewing needle and thread
Yarn Substitution
It will be hard to find a yarn quite like this for substituting. Tesla is made of stainless steel and cotton and has a great thick and thin quality. However, if you'd like to achieve a similar effect, you could combine a light weight, smooth, metallic yarn with a thick and thin or boucle yarn.
Stitches used:
- (K) Knit
- (P) Purl
- (Inc) Increase in front and back of stitch
- (k2tog and SSK) Decrease
- (DD) Double Decrease —slip 2 as if to k2tog, k1, pass 2 stitches over
 Purse
Front and Back
Purse
Front and Back

Cast on 45 stitches
Place a stitch marker before the center stitch
Row 1: K1, inc 1, K to 1 stitch before center, DD, K to last 2 stitches, inc 1, K 1
Row 2: K
Work for a total of 1"
Switch to working this pattern in STst (row 2 will now be purled) until the entire piece measures about 14" from cast on.
Cut yarn
Slip the first half of the stitches until you reach the center stitch.
Knit the center stitch
Begin to work back and forth working in one additional stitch each time you turn, and 2 additional stitches every fifth and sixth rows. You are basically working as though your stitches had be worked in short rows. For instance, your first 6 rows would be worked as follows:
Row 1: K1 stitch in middle, turn
Row 2: P same stitch and one additional stitch, turn
Row 3: K same 2 stitches plus one additional stitch, turn
Row 4: P same 3 stitches plus one additional stitch, turn
Row 5: K same 4 stitches plus 2 additional stitches, turn
Row 6: P same 6 stitches plus 2 additional stitches, turn
Keep going in this manner, adding 1 more stitch each row, except every fifth and sixth row when you'll add 2.
Once you have incorporated all remaining stitches, you will have a flat row of knitting instead of a bias design.
Work flat for 4 more inches or until your piece is the desired length including flap.
BO
Weave in ends
Sides (make 2)
CO 10 or number desired for bottom width of purse.
Work 10 rows in STst
Dec 1 stitch at each end of next row (8 total stitches)
Work 12 row in STst
Dec 1 stitch at each end of next row (6 stitches total)
Work another 10 rows in STst or until side insets are the right length for purse
BO
Weave in ends
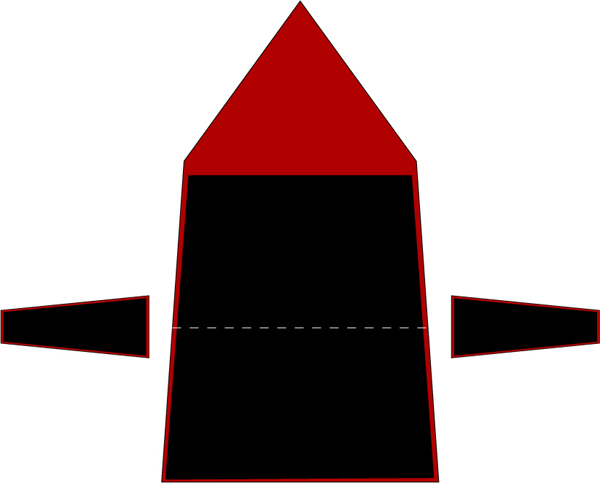
Lining (Optional)
I used one way stretch fusible interfacing, where the stretch runs lengthwise down the purse. Cut the interfacing to the same size, or just a bit smaller than the final pieces. Do not cover the flap when doing this. Refer to the diagram below.
Sew sides to the body of the purse catching interfacing along with the yarn. Use a sewing needle and thread, not the yarn.
Sew grosgrain ribbon around the inside mouth of the purse to cover raw edges of interfacing.
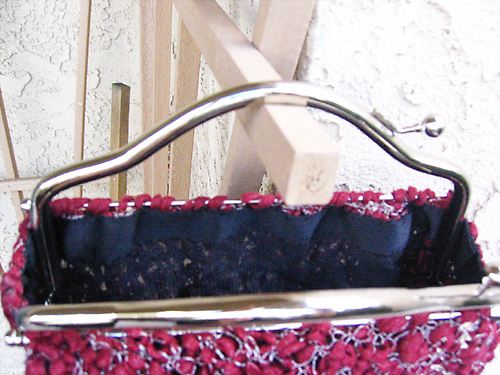
 Attach
Purse Frame
Attach
Purse Frame
If you didn't line the piece, simply sew it together. I highly suggest you use needle and thread, not the yarn.
The frame that I chose has rods that unscrew and can be woven into the stitches of the piece. Attach your purse frame as required. If your purse frame is similar to mine, make sure that the hinges are inside the bag. Tuck flap under the handle to close.
Thank you so much for your interest in my patterns. Most of my free patterns were efforts to learn to design and do not conform to industry standards for sizing or terminology. Enough people continue to knit from these designs that I am happy to leave these patterns up for people to use but I cannot offer any amendments or substantial support for them.
As with all my patterns, you are welcome to use these patterns for your own personal, non-commercial or charitable use. If you wish to sell items made from these patterns or teach classes using my patterns, please contact me. Please do not distribute this pattern in print or electronically or post this pattern to your own site or publication. If you wish to share this pattern, please send the person a link to my site.