Copyright Marnie MacLean 2003
Click on Images for Larger View

Gauge:
34 stitches x 44 rows = 4"
Supplies:
- #2 dpns (set of 5)
- 1.5 skeins of Regia Multi Effekt Color sock yarn in color of choice
- Stitch markers (sm)
- Stitch holders or waste thread
- Tapestry needle
Stitches used:
- 1 x 1 ribbing
- K
- P
- Increase (INC)
Working with DPNs
For the body of the glove, I have used 5 dpns, but I find working those little fingers really frustrating with dpns. For those, I actually worked them in double-knit. I'm sure there are some online tutorials if you wish to learn this technique, but in short, it involves placing all the stitches on a single needle, alternating between front and back stitches. I did this by places the back stitches on one DPN and the front stitches on another, then I used a third DPN to pick up a stitch from the front, then back, then front, then back and repeat until all stitches are on a single needle.
Now, *K the first stitch, bring yarn forward as if to purl, slip the next stitch, bring yarn back.* repeat to end of row and turn. Repeat on other side. You have now done a single round. Repeat as needed to get proper length.
Some people have suggested working double-knit inside out so that you purl every other stitch and don't need to throw the yarn back and forth before and after the slip stitches, but I find this leaves a ladder at each end.
Regardless, this is only a suggestion, please feel free to work these stitches in the round on multiple dpns if that suits you better.
 Gloves
CO 58 ensuring you begin at the start of a pattern change in the yarn. Place SM between first and last stitch. Distribute stitches evenly over 4 dpns. (15 st on first needle, 14 on second, 15 on third, 14 on fourth).
If you wish to resize, change your cast-on by a multiple of 4. When it comes time to work the fingers, you'll simple subtract or add 1 stitch to each finger for each multiple of 4.
Work 1x1 ribbing for 2 pattern repeats or to length you'd like your cuff to be.
K1 round.
Thumb Gore
K first 2 needles of stitches. K 3 stitches of 3rd needle. Place a SM, increase by knitting in front and back loop of next 2 stitches, place another SM, complete round.
*K2 rounds straight.
K to SM, Inc in next stitch, K to within one stitch of next SM, inc in next stitch, k to end of round.*
Repeat from * to * until you have 20 stitches between SMs.
K 1 row.
K to thumb gore. Move stitches between SM to waste thread or stitch holder. CO 2 stitches to fill in gap and complete round.
K19 rounds straight.
Lifeline
At this point I would place all remaining stitches on a waste thread. As you work the fingers, keep the thread in place in case you need to rework any of the fingers.
Cut yarn.
Index finger
Fold glove so that thumb is to one side and folded in half. This glove is worked to fit either hand so you want to make sure that you keep the thumb centered.
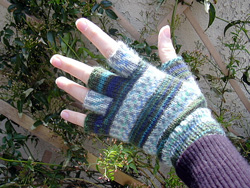
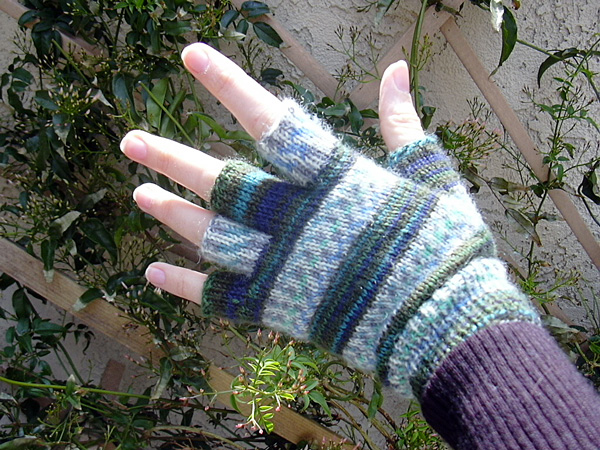
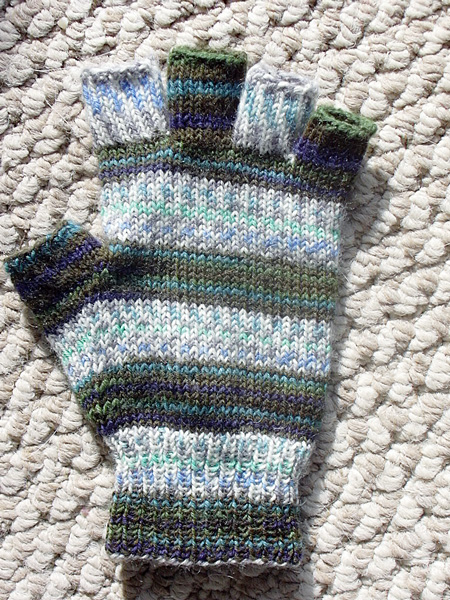
Cut off current repeat of yarn to next pattern section. Referring to the photos as a guide, work fingers in alternate pattern repeats. I found that one repeat of the pattern would easily work 2 fingers.
PU the 16 stitches closest to the thumb (8 in front, 8 in back). K first 8 stitches, from thumb end to middle, CO 2 stitches, K remaining 8 stitches.
Work these 18 stitches for a total of 11 rounds. BO as though working a 1 x 1 ribbing.
Cut thread and then cut yarn between this and the next pattern change. Save this extra yarn for the Ring Finger.
 Middle Finger
Starting with the next yarn pattern,
PU 7 stitches from front, and 8 stitches from back of glove.
K first 7 stitches, CO 2, k remaining 8 stitches, PU 2 stitches from Index Finger.
Work for 12 rounds total. BO as though working a 1x1 ribbing.
Cut thread and then cut between this and the next pattern change. Save this extra yarn for the Pinky Finger.
Ring Finger
Using left over yarn from first finger;
PU 7 stitches in front and 7 stitches in back.
K 7 stitches, CO 2, K remaining 7 stitches, PU 2 stitches from Middle finger.
K for a total of 11 rounds
BO as though working a 1x1 ribbing.
Pinky Finger
Using remaining yarn from middle finger.
PU remaining stitches. K around then PU 2 stitches from Ring Finger.
Work for a total of 7 rows.
BO as though working a 1x1 ribbing.
Thumb
Using same yarn pattern as Middle and Pinky finger;
Move all thumb gore stitches to dpns.
K around and PU 2 stitches from edge of glove to close hole.
K 6 total rounds, then BO as though working a 1x1 ribbing.
Finishing
Weave in all ends. Use scrap yarn to close up any holes between fingers. If you find the yarn a little itchy, wash with conditioner and tepid water. Dry flat.
Thank you so much for your interest in my patterns. Most of my free patterns were efforts to learn to design and do not conform to industry standards for sizing or terminology. Enough people continue to knit from these designs that I am happy to leave these patterns up for people to use but I cannot offer any amendments or substantial support for them.
As with all my patterns, you are welcome to use these patterns for your own personal, non-commercial or charitable use. If you wish to sell items made from these patterns or teach classes using my patterns, please contact me. Please do not distribute this pattern in print or electronically or post this pattern to your own site or publication. If you wish to share this pattern, please send the person a link to my site.