Copyright Marnie MacLean 2004
 I've
never had any success working two colors of yarn at once. My fabric ended up
both puckered and filled with holes. Because of this, I've been entirely reluctant
to even try. Then one day I was reading through some posts on KNITLIST and
heard about Twining*. (Please see footnote for resources.). After
a quick bout of swatching, I was inspired. That night, while thinking myself
to sleep (it's hard work, you know) I came up with the idea of a halter top
with a bomb on one side, it's fuse acting as a strap and ending on the other
side in a classic cartoon style spark. The Bombshell Halter was born. I went
scrambling through my yarn closet to find something to use and found an old
stash of Lion
Brand Kitchen Cotton. I wasn't sure it would work for a halter top but
the end result is surprisingly nice and very low maintenance. Of course, any
worsted weight cotton yarn will do.
I've
never had any success working two colors of yarn at once. My fabric ended up
both puckered and filled with holes. Because of this, I've been entirely reluctant
to even try. Then one day I was reading through some posts on KNITLIST and
heard about Twining*. (Please see footnote for resources.). After
a quick bout of swatching, I was inspired. That night, while thinking myself
to sleep (it's hard work, you know) I came up with the idea of a halter top
with a bomb on one side, it's fuse acting as a strap and ending on the other
side in a classic cartoon style spark. The Bombshell Halter was born. I went
scrambling through my yarn closet to find something to use and found an old
stash of Lion
Brand Kitchen Cotton. I wasn't sure it would work for a halter top but
the end result is surprisingly nice and very low maintenance. Of course, any
worsted weight cotton yarn will do.
Gauge:
5.5 stitches x 7rows = 1"
Supplies:
- #7 & #8 Knitting Needles (straight or circular)
- 1 skein each of Lion Brand Kitchen Cotton in Main (GREEN) and Complimentary (WHITE) color.
- D Crochet hook
- Thread
- Needle
- Tapestry Needle
Stitches used:
Knit
- Knit
- Purl
Crochet
- Chain (CH)
- Single Crochet (SC)
- Double Crochet (DC)
- Slip Stitch (SLP ST)
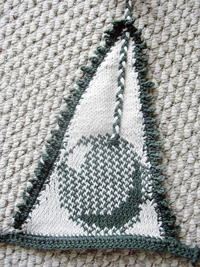
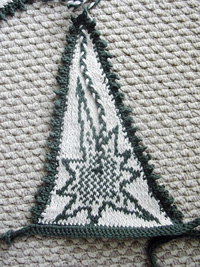
Front Panels
 Using
the chart provided (click on thumbnail for larger view or click
here for printable PDF) Work each side of the halter using Twining or stranding
technique of choice. I worked from the top down but you should work in the
manner that makes you happy. BO when finished
Using
the chart provided (click on thumbnail for larger view or click
here for printable PDF) Work each side of the halter using Twining or stranding
technique of choice. I worked from the top down but you should work in the
manner that makes you happy. BO when finished
Picot Border
Around each triangle work:
45 SC along inside edge, 3 SC in top corner, then 37 SC along outside edge.
CH1 turn.
*SC in next 2 SC, CH3, SLP ST in first CH ST.* repeat around.
Bomb Fuse / Neck Strap
 Cut
4 lengths of Green yarn to about 5 feet long.
Cut
4 lengths of Green yarn to about 5 feet long.
Cut 2 lengths of White yarn to about 5 feet long
Where you'd like fuse to start, using a tapestry needle, weave one green, then one white then one green length of yarn. (See image to left). Braid the yarn and tie with a knot or sew with thread. Using a crochet hook, pull braid through the 3SC at top of triangle.
Do the same on the other triangle
 Securing
Neck Strap
Securing
Neck Strap


Refer to images at right and use thread and needle to secure bomb fuse. You may opt to allow the fuse to curve a little. You can click on thumbnails for a closer look.
Ties
With green yarn and crochet hook, CH 80, SC in each stitch at base of one of triangles, starting from the inside edge. CH 50, SC in each stitch at base of other triangle starting at outside edge, CH 84.
DC in 4th CH from hook. Work DC in each stitch across.
Cut yarn and tie off end.
The top is worn by overlapping the long tails in front then tying them in back. You may want to put a couple of loops on either side of the piece, right under your arms, to thread the ties through so they don't slip down.
Footnote
 *Dr. Laura
Andersson,
posted a comment about "Twining" to KNITLIST.
She directed me to her tutorial, available for a small fee from Stranded.
As you can see, in the image to the left, the back of Twined work is very
neat. The yarn is carried even along areas of solid color. The result is
a flexable fabric with no holes and no puckers. Hoorah!
*Dr. Laura
Andersson,
posted a comment about "Twining" to KNITLIST.
She directed me to her tutorial, available for a small fee from Stranded.
As you can see, in the image to the left, the back of Twined work is very
neat. The yarn is carried even along areas of solid color. The result is
a flexable fabric with no holes and no puckers. Hoorah!
Thank you so much for your interest in my patterns. Most of my free patterns were efforts to learn to design and do not conform to industry standards for sizing or terminology. Enough people continue to knit from these designs that I am happy to leave these patterns up for people to use but I cannot offer any amendments or substantial support for them.
As with all my patterns, you are welcome to use these patterns for your own personal, non-commercial or charitable use. If you wish to sell items made from these patterns or teach classes using my patterns, please contact me. Please do not distribute this pattern in print or electronically or post this pattern to your own site or publication. If you wish to share this pattern, please send the person a link to my site.