Copyright Marnie MacLean 2003
Click on Images for Larger View
 Gauge:

22st x 28rows = 4”
Supplies:
- #8 straight or circular needles
- #7 26” or 28” circular needles
- 2 skeins of Diva in silver
- 1 skein of Diva in black
- Crochet hook size B
- Black Upholstery Thread (found at craft store)
- Various beads (found at craft store)
- Metal choker (found at craft store in beading aisle)
Yarn Substitution
Diva is a metallic yarn with just a touch of eyelash, and works up at about a worsted weight. Substitute with any worsted weight yarn, though a combo of a very fine mohair and a metallic worsted weight yarn, would produce a similar effect.
Stitches used:
- Stockinette (STst)
- 2x2 Ribbing (K2P2 or P2K2)
- Make 1/Knit 2 tog (M1 K2tog)
- Single crochet and chain stitch (sc and ch)
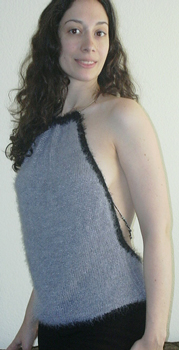
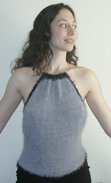 FRONT:

CO 94 in Diva Silver
Working STst
(K4 rows, Dec 1 at each end of 5th row) x5 [82 st total]
K8 rows, Inc 1 at each end of 9th row
(K3 rows, Inc 1 at each end of 4th row) x 4 [92 st total]
K even to 63 rows
If you would like a little more ease for the bust, you can work some short row shaping as follows: Please note that you should NOT count these as rows in the entire piece’s row count.
(Work to last 2 stitches, bring yarn (forward for K/back for P), slip one, bring yarn back, slip same stitch back.) [this leaves 2 unworked stitches] Repeat on other side
Repeat same process back and forth, except working to last 3 stitches on next 2 rows, 4 stitches for the following rows and continue through 5, 6, and 7.
This may sound confusing, but there are many good online tutorials for Short Row Shaping that you may refer to. One in particular that I like is here.
Work 2 rows picking up any un-worked short-row stitches as you come to them. [65 rows]
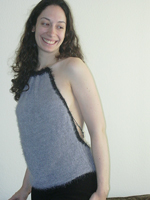 ARMHOLES:

(BO first 4 stitches ) x2 [67 rows] (mark this last row to indicate where beading will go)
(Dec 1 st at each end of every row) x4 [71 rows]
(Dec 1 st at end of every other row) x7 [85 rows]
(Dec 1 st at the end of every 3rd row) x3 [94 rows]
(Dec 1 st at the end of every 4th row) x4 [110 rows and 46 st]
BO remaining stitches
 BACK
BACK

CO 94 on #7 needles with Silver Diva place stitch marker at center
Work K2 P2 ribbing for 10 rows
*K to center marker, turn work. (You will now only work one side of back at a time)
BO 5 stitches then continue working to end.
Continue working K2P2 ribbing decreasing one stitch at center back each row until one stitch remains.
BO final st.*
Repeat on other side from t
Attach front and back at side seams aligning bottom edges.
RIBBING:
With size #7 circular needles, pickup 170 stitches from armhole to armhole including the entire back but DO NOT pickup stitches across top of front.
Work 5 rows of K2P2 ribbing
BO
Pickup 188 stitches along bottom edge of entire piece and work 5 row of K2P2 ribbing.
BO
 NECK:
NECK:
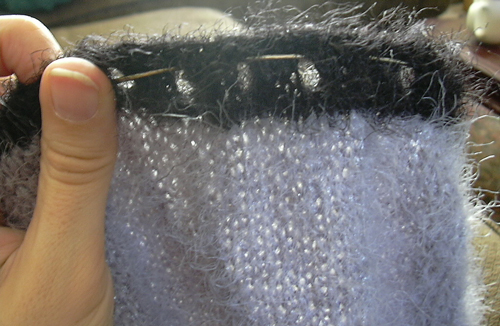
Pickup all 46 stitches from neck with #7 needles, as well as 4 stitches from each band of ribbing on either side of neck.
Work 2 rows of K2P2 ribbing
If next row is a P row for you:
*P2 M1 K2tog* to end
If next row is a K row for you:
K2 M1 P2tog to end
Work 2 more rows of K2P2 ribbing
BO
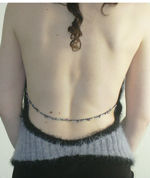
 BEADING:
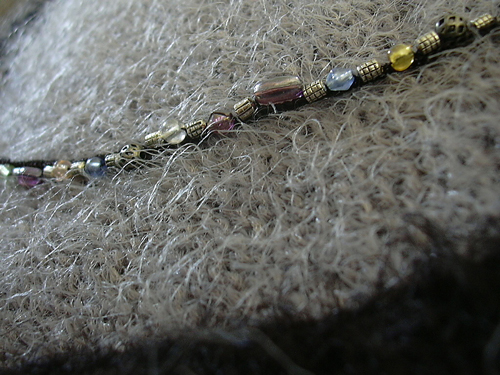
Take spool of upholstery thread and string various small beads onto it, using a beading needles if necessary. When strung, beads should cover about 10-12 inches.
Using size B crochet hook, chain 30 stitches.
Begin to work beads into chain moving one bead down to chain before working next chain stitch. Do this for all beads.
Chain 31 stitches, turn.
Skip first chain and then work one SC into each CH to first bead.
Work 3 to 5 stitches into thread behind each bead. Work all beads in this way, using enough SC to evenly fill chain stitches behind beads.
SC into each CH stitch after beads.
Cut thread and pull through remaining loop to finish.
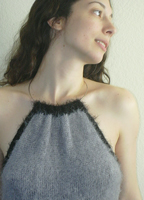 FINISHING:

Sew beaded chain to WRONG SIDE of front where marked during knitting. Adjust length to allow chain to follow arc of back.
Thread metal choker through eyelets in neck.
Thank you so much for your interest in my patterns. Most of my free patterns were efforts to learn to design and do not conform to industry standards for sizing or terminology. Enough people continue to knit from these designs that I am happy to leave these patterns up for people to use but I cannot offer any amendments or substantial support for them.
As with all my patterns, you are welcome to use these patterns for your own personal, non-commercial or charitable use. If you wish to sell items made from these patterns or teach classes using my patterns, please contact me. Please do not distribute this pattern in print or electronically or post this pattern to your own site or publication. If you wish to share this pattern, please send the person a link to my site.