Copyright Marnie MacLean 2005
Click on Images for Larger View
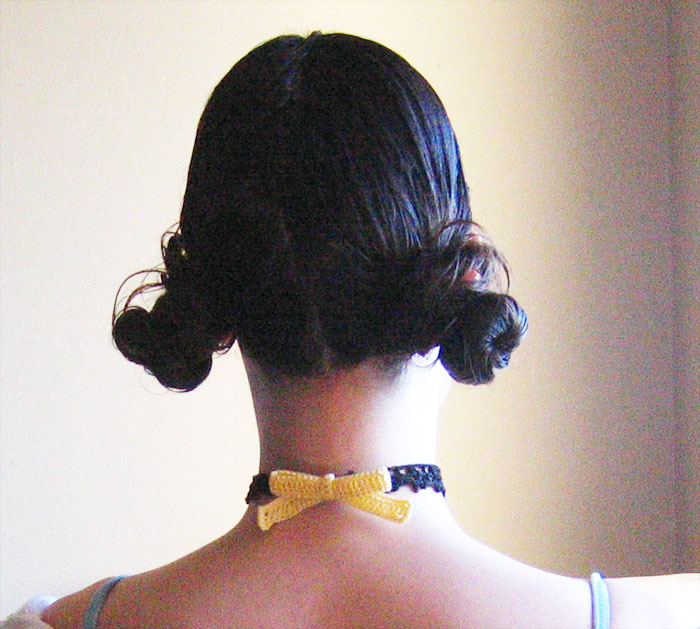
There are many worthy causes for which to wear a ribbon, but there's no reason to be boring about it. This simple pattern can be worked up in a couple hours and would suit a funky and casual outfit or more dressy occasion. The piece will work best if the choker is snug enough to prevent the ribbon from sagging, so either measure carefully or make sure to follow the instructions for making it multi-sized.
Supplies
- Black crochet thread, size 10
- Crochet thread in appropriate color for cause (yellow for troop support, pink for breast cancer awareness, red for AIDS awareness, etc)
- #7 steel crochet hook (1.65 mm)
- Small black flat button for closing choker. You'll need several to make it multi-sized
- About 50 large seed beads (optional)
- Thread and needle for button
- Embroidery needle for weaving in ends
Stitches used
- Chain (CH)
- Single Crochet (SC)
- Double Crochet (DC)
- Picot [ch 3, sc in first ch of ch3
Picking a style
 There are two lace designs. The "Plain Lace" is from a vintage
edging book I have. It's very firm and straight and looks slightly less formal.
I think this would go great with jeans and a v-neck t-shirt and a casual jacket.
There are two lace designs. The "Plain Lace" is from a vintage
edging book I have. It's very firm and straight and looks slightly less formal.
I think this would go great with jeans and a v-neck t-shirt and a casual jacket.
The second is my modification of the lace. I've made the bottom edge more scalloped and replaced all picots with beads. This is a more dressy look and your choice of beads can really enhance that.
Plain Lace Pattern
Row 1: Make a chain slightly longer than desired lace repeat. I like to work about 2" shy of total desired length of choker
Turn
Row 2: Skip 5 ch, dc in next ch (loop for button made), *ch2, skip next 2 ch, (dc, picot, dc) in next ch, ch2, skip next 2 ch, dc in next ch.* Repeat till you have reached the desired length. You can unravel any unused chain stitches.
Turn
Row 3: *Ch 5, sc in next single dc* across
Turn
Row 4: Ch1 *3sc into ch5 loop, picot, 2 sc into same ch5 loop, picot, 3 sc into same ch5 loop* across
Do not cut thread
Beaded Lace Pattern
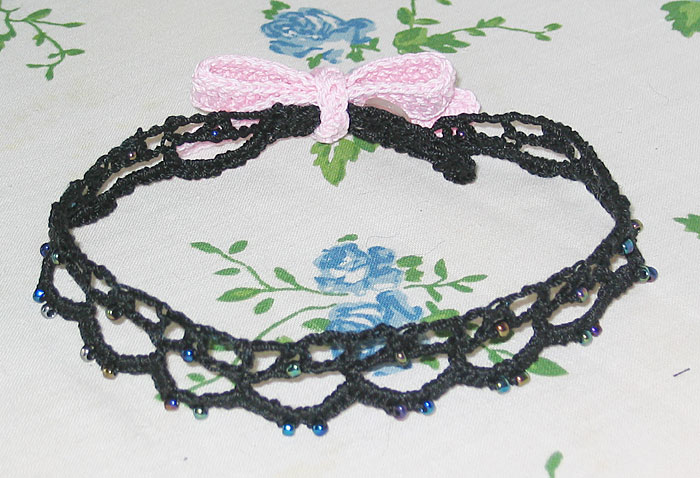 In this version, all picots are replaced with a bead secured
with a SC. Thread 3 beads for each lace repeat onto the thread before beginning.
When the pattern calls for a bead, slide the bead to the work, and make a SC
after the bead.
In this version, all picots are replaced with a bead secured
with a SC. Thread 3 beads for each lace repeat onto the thread before beginning.
When the pattern calls for a bead, slide the bead to the work, and make a SC
after the bead.
Row 1: Make a chain slightly longer than desired lace repeat. I like to work about 2" shy of total desired length of choker
Turn
Row 2: Skip 5 ch, dc in next ch (loop for button made), *ch2, skip next 2 ch, (dc, bead, dc) in next ch, ch2, skip next 2 ch, dc in next ch.* Repeat till you have reached the desired length. You can unravel any unused chain stitches.
Turn
Row 3: *Ch 7, sc in next single dc* across
Turn
Row 4: Ch1 *4sc into ch5 loop, bead, 2 sc into same ch5 loop, bead, 4 sc into same ch5 loop* across
Do not cut thread
 Extension
Turn your work 90 degrees so that you are no longer work the length of choker, but instead are working along the side edge.
Work 3 SC along this end
Ch3 Turn
*Skip first sc, dc in next 2 sc* Repeat this row until your extension is about 2 inches or long enough to make the choker fit comfortably around your neck with a little overlap. Make it longer if it will need to be multi-sized. 14-15 inches should fit many necks.
Cut yarn and pull through last loop.
Weave in all ends
Block everything
Ribbon
 Ch as long as you'd like your ribbon to be. I think 7-8" is
nice.
Ch as long as you'd like your ribbon to be. I think 7-8" is
nice.
Turn
Skip first 3 chain, dc in next chain and all subsequent chain stitches.
DO NOT TURN
Working around the entire row of dcs on all 4 sides, work sc in every stitch, work 3 sc in each corner.
Cut yarn, pull through loop. Weave in ends.
Block
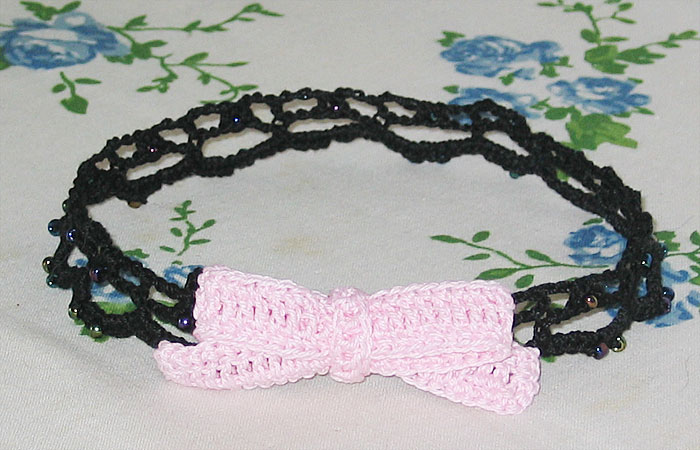
Fold ribbon into a bow by folding into approximately thirds. See illustration.
Attaching the bow
 Cinch the center of the bow and attach it by making a ch
long enough to encircle the center of the bow+3 ch.
Cinch the center of the bow and attach it by making a ch
long enough to encircle the center of the bow+3 ch.
Turn
Skip 3 ch, dc in all subsequent ch.
Wrap this around both the center of the bow and the extension.
SC both ends together, securing the ribbon onto the extension.
Closure
If you know the neck size of the recipient, sew the button on so when drawn through the button loop, it fits snugly. Slide the ribbon out of the way, as necessary.
If you don't know the neck size of the recipient, sew several buttons along the length of the extension, moving the ribbon out of the way, as necessary.
Thank you so much for your interest in my patterns. Most of my free patterns were efforts to learn to design and do not conform to industry standards for sizing or terminology. Enough people continue to knit from these designs that I am happy to leave these patterns up for people to use but I cannot offer any amendments or substantial support for them.
As with all my patterns, you are welcome to use these patterns for your own personal, non-commercial or charitable use. If you wish to sell items made from these patterns or teach classes using my patterns, please contact me. Please do not distribute this pattern in print or electronically or post this pattern to your own site or publication. If you wish to share this pattern, please send the person a link to my site.