Copyright Marnie MacLean 2003
Click on images to see larger version
 This
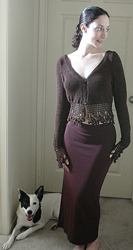
is a fairly advanced pattern requiring a lot of crochet as well as knit. Venus has
a great light feeling and a lot of drape, but this pattern could be worked
in other yarns as well. I think this design would be decadent in Luna,
or delightful in Chai or Siam.
It's knit up as a deep v-neck, but ends up being a much shallower v-neck when
the bottom is eased in with the lace. This may not be the only way to achieve
the effect, but it's the way I did it. I have very long arms (my knuckles drag
on the ground when I walk) so I made the sleeves quite long, feel free to lob
off a few inches before working the sleeve caps to adjust for your arm length.
This
is a fairly advanced pattern requiring a lot of crochet as well as knit. Venus has
a great light feeling and a lot of drape, but this pattern could be worked
in other yarns as well. I think this design would be decadent in Luna,
or delightful in Chai or Siam.
It's knit up as a deep v-neck, but ends up being a much shallower v-neck when
the bottom is eased in with the lace. This may not be the only way to achieve
the effect, but it's the way I did it. I have very long arms (my knuckles drag
on the ground when I walk) so I made the sleeves quite long, feel free to lob
off a few inches before working the sleeve caps to adjust for your arm length.
I highly recommend you read through the entire pattern before starting, especially when moving to the front which asks you to follow 2 sets of directions at the same time.
Gauge
22 st x 30 rows = 4"
Supplies:
- About 8 Skeins of Venus in color of choice.
- #7 Knitting Needles in Dbl Pointed and Straight
- F Crochet Hook
- 5 Hook and Eye
Stitches used
Knit:
- 2 x 2 rib
- Stockinette (STst)
- 1 x 1 rib
Crochet:
- Chain (ch)
- Single Crochet (sc)
- Half Double Crochet (hdc)
- Double Crochet (dch)
- Triple Crochet (trc)
Lace pattern from The Ultimate Sourcebook of Knitting and Crochet Stitches by Reader's Digest :
Flamenco Edging:
1st Row (RS) Ch 31, work 1dc into 7th ch from hook, [2ch, skip 2ch, 1dc into next ch] 8 times, turn, (9sps.)
2nd Row: Ch5 (count as 1dc, ch2), skip 1st dc, 1dc into next dc, [ch2, 1dc into next dc] 3 times, ch5, skip next 4 sps, 1dc into next sp, work [ch3, 1dc] 3 times into same sp as last dc, turn.
3rd Row: Ch1, 1sc into 1st dc, into 1st ch3 sp work [1hdc, 1dc, 1tr, 1dc, 1hdc, 1sc], into next ch3 sp work [1sc, 1hdc, 1dc, 1tr, 1dc, 1hdc, 1sc], into next ch3 sp work [1sc, 1hdc, 1dc, 1tr, 1dc, 1hdc], 1sc into next dc, ch5, 1dc, into next dc, [ch2, 1dc into next dc] 4 times placing last dc into 3rd ch of ch5 at beg of prev row, turn.
4th Row: Ch5 (count as 1dc, ch2), skip 1st dc, [1dc into next dc, ch2] 4 time, 1dc into ch5 sp, ch7, skip 1st group of 7 sts, work 1dc into trc at center of next group of 7 sts, [ch3, 1dc]3 times into same st as last dc, turn.
5th Row: Ch1, 1sc into 1st dc, into 1st ch3 sp work [1hdc, 1dc, 1tr, 1dc, 1hdc, 1sc], into next ch3 sp work [1sc, 1hdc, 1dc, 1tr, 1dc, 1hdc, 1sc], into next ch3 sp work [1sc, 1hdc, 1dc, 1tr, 1dc, 1hdc], 1sc into next dc, 5ch, 1dc into ch7 sp, [ch2, 1dc into next dc] 6 times placing last dc into 3rd ch of ch5 at edg of prev row, turn.
6th Row: Ch5 (count as 1dc, ch2), skip 1st dc, [1dc into next dc, ch2] 6 times, 1dc into ch5 sp, ch7 skip 1st group of 7 sts, work 1dc into trc at center of next group of 7 sts, [ch3, 1dc] 3 times into same st as last dc, turn.
7th Row: 1sc into 1st dc, into 1st ch3 sp work [1hdc, 1dc, 1tr, 1dc, 1hdc, 1sc], into next ch3 sp work [1sc, 1hdc, 1dc, 1tr, 1dc, 1hdc, 1sc], into next ch3 sp work [1sc, 1hdc, 1dc, 1tr, 1dc, 1hdc], 1sc into next dc, 5ch, i dc into ch7 sp, [ch2, 1dc into next dc] 8 times placing last dc into 3rd ch of ch5 at beg of previous row, turn. Rep 2nd to 7th rows end with a 7th row.
 Sleeves:
Work 4 repeats of Flamenco Edging, sewing beginning row to ending row.
With dbl pointed needles, pick up 48 stitches from mesh end of Flamenco edging. Place stitch marker at between 1st and last row.
Work 12 rows of 2x2 ribbing, starting with K1, then *P2, K2* to last stitch ending with K1 so that stitch marker is placed between 2 K sts.
Next 4 rows: K5, continue 2x2 ribbing to last 5 st, K5
Next 4 rows: K9, continue 2x2 ribbing to last 9 st, K9
Continue in this manner, adding 4 more straight K stitches to either side of 2x2 ribbing until all st are worked in STst. Work only 1 row of complete STst rows. (33 total rows)
Inc 1 on both sides of stitch marker on rows:
36, 48, 60, 72, 84, 97, 110, 123, 133 (66 total sts)
Work straight to 148 rows
Start sleeve cap working back and forth instead of in the round:
BO 6 at beg of next 2 rows
Dec 1 st at each end of every 2nd row once, then dec 1 st at each end of every 3rd row 14 times, then dec 1 st at each end of every 2nd row once. Cast off remaining 22 sts loosely.
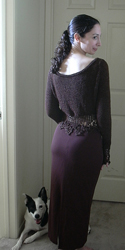 Back
and Front
Back
and Front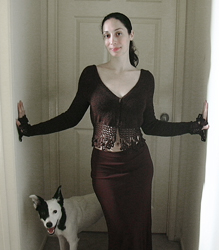
Refer to this chart to knit the front and back of the sweater. I worked the piece from the bottom of the back, up to the shoulder, and continued back down the front of the piece. You can opt to work each piece separately, if you prefer.
Assembly
Sew front to back at side seams
Sew sleeves to body
Neck Ribbing:
Pick up 265 st around neck, and work 1 x 1 ribbing for 6 rows.
BO
 Body
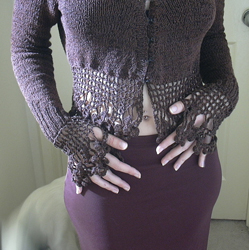
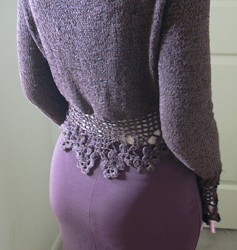
Lace:
Body
Lace:
(Work 6 repeats of Flamenco Edging) x 2 (this should be long enough to fit around your rib cage. Measure length of single repeat of edging and multiple by 6 to see if it will fit, if not, add one repeat to each side)
Sew together along ending rows so that edging mirrors itself. This will be the back seam for the lace. Put Aside.
With crochet hook, SC along bottom edge of sweater, placing one SC in each K stitch across along with 4 stitches in each side of ribbing.
Ch1, turn
*SC in each of next 4 SC, SC next 2 SC tog* across
Ch1 turn
With right sides of lace and sweater together, find the center back of sweater and with safety pin or stitch holder, pin it to center back of lace. SC mesh end of lace to sc row of bottom hem. Work in any ease.
Closure:
Sew Hook and Eye evenly along bottom 6 inches of front closure.
Thank you so much for your interest in my patterns. Most of my free patterns were efforts to learn to design and do not conform to industry standards for sizing or terminology. Enough people continue to knit from these designs that I am happy to leave these patterns up for people to use but I cannot offer any amendments or substantial support for them.
As with all my patterns, you are welcome to use these patterns for your own personal, non-commercial or charitable use. If you wish to sell items made from these patterns or teach classes using my patterns, please contact me. Please do not distribute this pattern in print or electronically or post this pattern to your own site or publication. If you wish to share this pattern, please send the person a link to my site.