Copyright Marnie MacLean 2007
Click on Images for Larger View
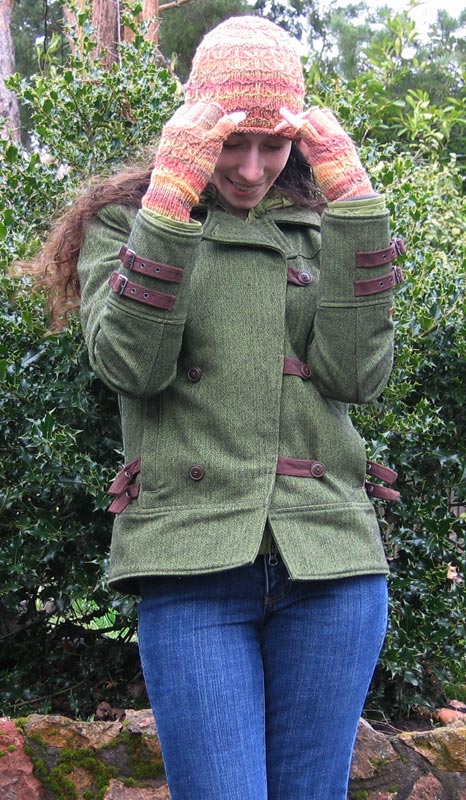
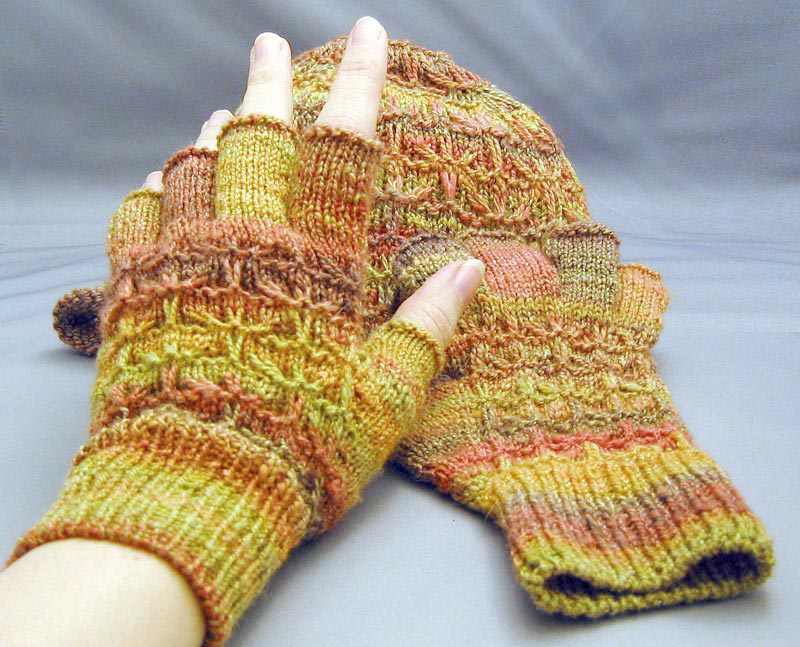
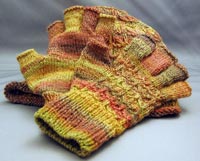
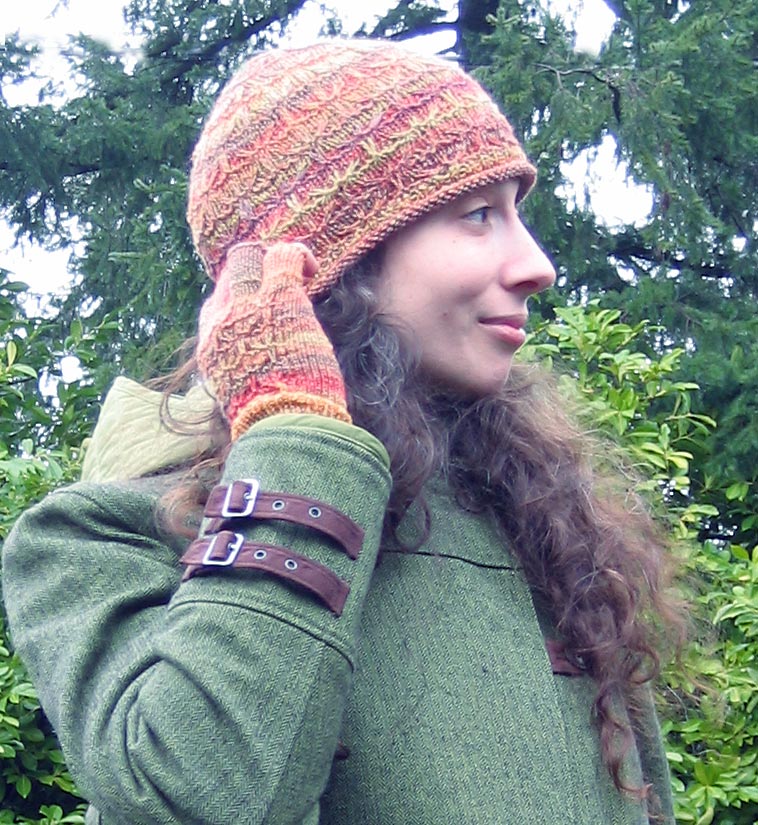
Like the Hooray For Me Gloves, these gloves stop mid finger for maximum dexterity. I love to wear these gloves while walking Panda to, where else, Lake Park. With my fingers free, I can easily adjust my iPod, or give Panda a nice scratch behind the ears, but the gloves gives me just enough warmth to keep out the Portland winter chill. These employ the same stitch pattern as the Lake Park Hat, but are worked at a tighter gauge.
I've used my own handspun fiber, however, you don’t have to be a spinner to make this pattern. You can substitute any variegated sock weight yarn to get great results.
If you want to use handspun, but your yarn is a little thicker,
I've offered suggestions for customizing the fit. You'll see them indented
and italicized like this:
Customization directions look like this.
About the fiber
Merino Viscose blend from Chameleon
Colorworks in colorway,
Autumn
Spun as a 2 ply, sock weight yarn
 Gauge:
28 stitches and 48 rows = 4” in stockinette stitch
Supplies:
- US #2 needles DPNs
- About 35 grams of sock weight yarn.
- Tapestry needle
- Stitch Markers
- Smooth undyed, cotton waste yarn for lifelines and provisional cast on
- Crochet hook for provisional cast on, if desired
Stitches used:
- Knit (k)
- Purl (p)
- Knitting and purling, wrapping yarn twice
- Slip with yarn at back of work (slyb)
- Knit two together (k2tog)
- Slip slip knit (SSK)
- Crossing stitches
- Increase (inc) Any increase will work, I have used the "knit in front and back" increase throughout
Sizes
Should comfortably fit a hand from 6-8 inches around palm of hand. There are instructions for modifying for your gauge and specific sizes. Once you know the basic constructions, you'll find that you can easily adjust for a custom fit.
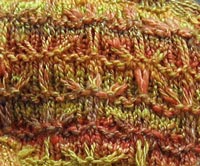
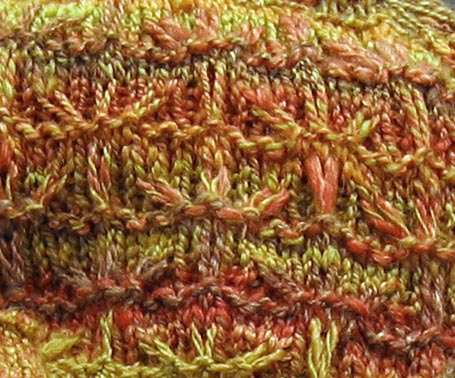
Chart Legend
| K: Knit | |
| P: Purl | |
Purl stitch, wrapping yarn around twice On the next round, unwrap and work as a single stitch |
|
| SL: Slip stitch with yarn in back | |
| Cross slipped stitch left: Drop slipped stitch to front. knit next two stitches, knit dropped slipped stitch. | |
| Cross slipped stitch right: Pass next two stitches to right needle. Drop next slipped stitch to front of work. Slip two stitches back to left needle. Knit dropped slipped stitch, knit next two stitches. | |
| K2tog: Knit next two stitches together | |
| SSK: Slip next two stitches as if to knit. Knit them together through back loop. | |
| Orange stitches denote the portion of the lace worked for all repeats | |
| Blue blocks are only worked for the last repeat in your lace panel. For instance, if you have 3 lace repeats, you will work rows 1-10, 3 times, then work the blue column once, to produce a symmetrical pattern. |
Lace Repeat

Right Hand
 Cuff
Cuff
The cuff is worked in 1x1 ribbing. I like to use a tubular cast on, but you may skip this step and work any cast on you like, if you wish.
Using a provisional cast on, CO 24 stitches for a tubular cast on, or 46 stitches for a standard cast on.
Working at a different gauge, measure your hand, and multiply the number of inches times your number of stitches per inch. Divide this new number by 2 and add one if the number is odd and 2 if the number is even. This is your tubular cast on number.For tubular cast on only:
If you will be working another cast on, multiply your gauge per inch by your hand size. Round to the closest number that is divisible by 2 but not by 4 (so that you will have an odd number of stitches on the top and bottom of the glove)
- Using two DPNS, work three rows in stockinette, starting with a purl row. Your stitches are now on needle 1
- Rip out the provisional cast on and move those stitches to another DPN, this is needle two. With another DPN, pickup one stitch from needle one, then one stitch from needle two, repeating until you have picked up all stitches.
- Your last stitch should be from needle one and you should have a total of 47 stitches on needle 3. Work this entire row of 47 stitches in K1 P1 ribbing, starting and ending with a knit stitch.
For all cast ons
Divide stitches over 3 DPNS, placing the first 23 stitches on one needle and dividing the remaining stitches over the other two needles. Begin working in the round, in k1, p1 ribbing. If you worked a tubular cast on, knit the first and last stitch together.
If working a different number of stitches, place half the stitches on the first needle and split the remaining across two other needles.
Work in 1x1 ribbing for a total of 25 rounds or for as long as you'd like your cuff to be. For a tighter cuff, you can work your ribbing entirely through the back loop.
 Beginning
the Hand
Beginning
the Hand
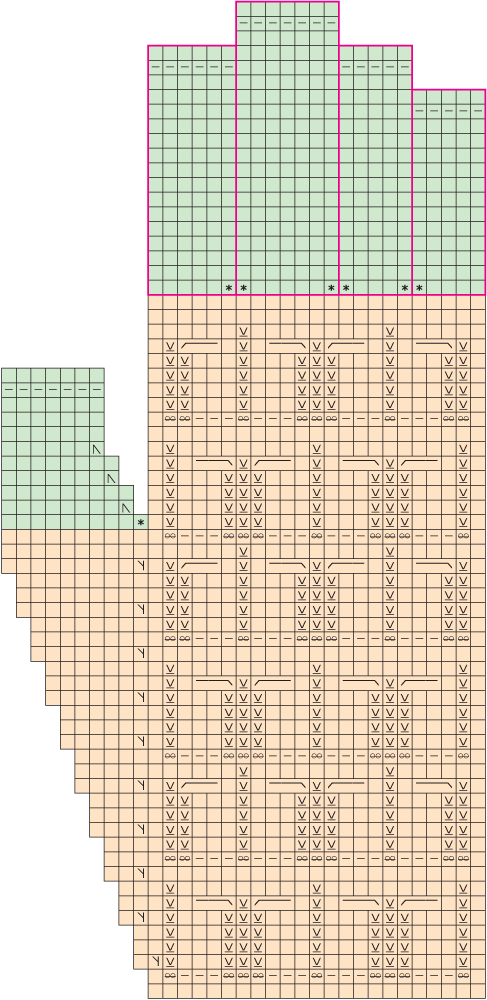
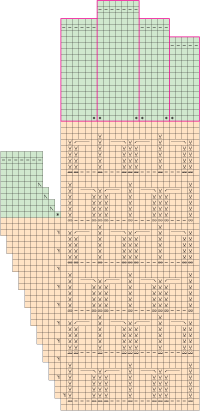
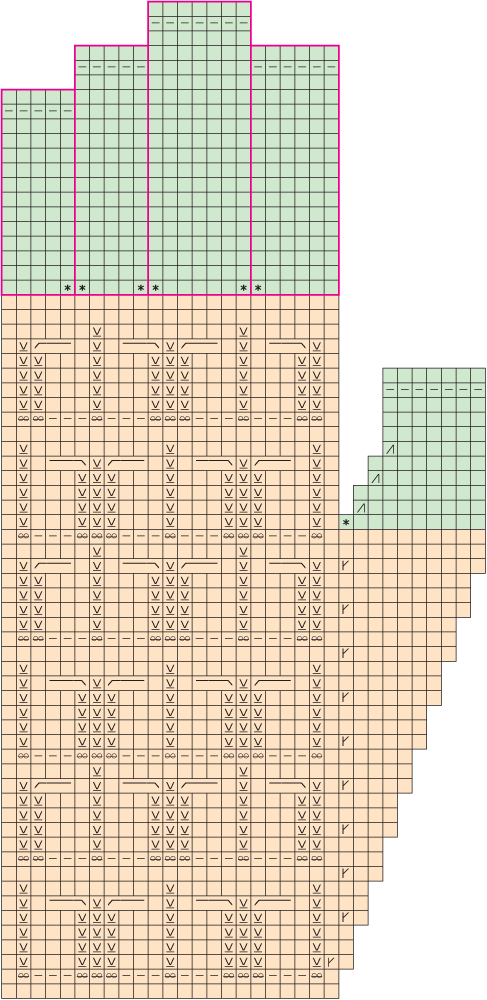
To the right is a stitch by stitch representation of the TOP of the glove. The orange blocks are all worked as one piece and the green blocks indicate fingers which are worked later and separately.
![]() This
symbol indicates that additional stitches are picked up. It is used
only in the fingers.
This
symbol indicates that additional stitches are picked up. It is used
only in the fingers.
![]() This
symbol indicates a kfb or a left leaning increase of your choice
This
symbol indicates a kfb or a left leaning increase of your choice
![]() This
symbol indicates a kbf or a right leaning increase of your choice
This
symbol indicates a kbf or a right leaning increase of your choice
The entire piece is worked in the round.
You will be working 1 stitch + 21 stitches in pattern (2–10 stitch repeats+1)+ 1 stitch across the top of the glove, then the rest of the round is worked in stockinette.
If your stitch count is different, divide the number of stitches on needle one, by 10. This is how many pattern repeats you will work. One stitch is for the blue column of the stitch pattern. The remaining stitches should be divided in two and worked as extra stitches on either side of the central motifs. For instance, if you have 35 stitches on needle one, you would work 2 stitches in stockinette, 31 stitches (3–10 stitch repeats +1) in the stitch pattern then 2 more stitches in stockinette.
Thumb gore
Beginning in pattern, working the first 23 stitches in the pattern discussed above, and the remaining stitches in STst, work 2 rounds straight.
Next round, work to last stitch on needle one. Knit in the front of the stitch but do not remove the stitch from the left needle, place a stitch marker, knit in the back of the same stitch.
If you find this hard to manage, just knit in the front and back of the stitch, slip the second stitch back to the left needle, place marker and slip it to the right needle again.
Knit in the back of the next stitch but do not remove the stitch from your left needle, place stitch marker, knit in the front of the same stitch. Work to end of round.
You now have a total of 48 stitches with two stitches between the stitch markers. From now on, all thumb gore increases will be performed on the stitches inside and closest to the stitch marker. You can refer to the stitch by stitch schematic above for a visual representation of the results.
****Work two rounds straight
On next round, increase in the stitch after the first stitch marker and again in the stitch before the next stitch marker. ****
Repeat from **** to **** until you have 20 stitches between the markers or until you have increased enough to accommodate the thickest part of your thumb.
Work 2 more rounds straight.
Move all the thumb gore stitches (those between the stitch markers) to scrap yarn. You will now knit only the original 46 stitches, continuing to do so in the round and maintaining the stitch pattern.
 Completing
the main portion of the glove
Completing
the main portion of the glove

Work 14 more rows in pattern, or to the length desired, ending on row 8 or 16 of the pattern.
Work 2 more rows straight.
Do not cut the yarn.
Move all stitches from needle 1 to a piece of scrap yarn
Move the remaining stitches to a second piece of scrap yarn.
These are your lifelines. If you find you didn't work the fingers correctly, the life lines will hold those stitches for you while you rip.
Fingers
Referring back to the schematic, the 23 stitches on each side of the palm will be divided up among the fingers as follows:
- Pinky: 5 stitches
- Ring: 5 stitches
- Middle: 7 stitches
- Index: 6 stitches
If your stitch count is different than that specified in this pattern, you will need to determine how many stitches will be necessary for each finger. You will cast on or pick up two additional stitches for the pinky and index finger. You will pick up 4 additional stitches each, for the ring and middle finger. Keep that in mind when determining how you will divide the stitches for the fingers.
For instance, I generally make the index and ring finger the same size. However, the index finger will only increase 2 stitches and the ring finger will increase 4 stitches, so I have to pick up one additional stitch on each side of the index finger than I would on the ring finger, to make them the same size.
Pinky
Your yarn should be attached to the side of your glove that is farthest away from your thumb. With the right side of the glove facing up, thumb to the left, pick up the right most 5 stitches on separate needles, from the front and back waste yarn.
Knit the first needle, increasing in the last stitch for a total of 6 stitches on your first needle
Increase in the first stitch of your next needle, then knit to the end of the needle, for 6 stitches total on your second needle and total of 12 stitches for the pinky.
Completing the finger
- With a third needle, pickup one stitch from your front needle then one stitch from your back needle. Continue in this manner until all stitches are on a single needle, starting with a front stitch and ending with a back stitch.
- **Knit the first stitch on the needle, bring the yarn forward, slip the next stitch.** Repeat across all stitches, ending with a slipped stitch. Remember you MUST slip the yarn IN FRONT.
- Turn the work and repeat on the other side. You have now worked one complete round.
- Referring to the chart or to your own preference for finger length, keep knitting the fingers until they are long enough. Work one full round (2 sides) in purl.
- Move the stitches back to separate needles, slipping the first stitch onto one needle, then the second stitch onto a second needle, back and forth across the whole row.
- BO all stitches. I like to work an elastic bind off as follows:
- K1, **slip stitch back to left needle. K2tog** repeat around entire finger.
- Cut yarn and pull through last loop to finish.
Ring finger
Pickup 5 stitches in front and in back, placing them on separate needles.
Moving from right to left, Starting with the top of the glove:
**Pick up one stitch from the base of the pinky closest to the first stitch. Knit the next 5 stitches. Increase in the next stitch. You now have 7 stitches on your first needle.** Reverse for the other side.
You should have a total of 14 stitches with 7 stitches on each needle.
Refer back to the section above titled, "Completing the finger"
Middle finger
 Pickup
7 stitches in front and in back, placing them on separate needles.
Pickup
7 stitches in front and in back, placing them on separate needles.
Moving from right to left, Starting with the top of the glove:
**Pick up one stitch from the base of the ring finger, closest to the first stitch. Knit the next 7 stitches. Increase in the next stitch. You now have 9 stitches on your first needle.** Reverse for the other side.
You should have a total of 18 stitches with 9 stitches on each needle.
Refer back to the section above titled, "Completing the finger"
Index finger
Pickup 6 stitches in front and in back, placing them on separate needles.
**Pick up one stitch from the base of the middle finger, closest to the first stitch. Knit the next 6 stitches. You now have 7 stitches on your first needle.** Reverse for the other side.
You should have a total of 14 stitches with 7 stitches on each needle.
Refer back to the section above titled, "Completing the finger"
Thumb
Place all 20 stitches on 3 needles divided as follows. Place 7 on the first needle, 6 on the second needle and 7 on the third needle. Have the first needle start with the front stitch closest to the hand and work around.
Work the first round, by picking up one stitch from the main portion of the glove, adjacent to the thumb, then work the remainder of the first needle so there are 8 stitches total. Knit the second needle straight, then work to the end of the third needle, pick up another stitch from the adjacent area of the main portion of the glove. You now have a total of 22 stitches.
**SSK at the beginning of the next round, work to end of round, k2tog. Work one round straight.** repeat 2 more times so that you have decreased 6 stitches total and have 16 stitches.
If your thumb has a different number of stitches, decrease as often as necessary to reduce the circumference to the correct size for your thumb
Work 3 rounds straight.
Work 1 round purled.
The work rows 7-8 of the section "Completing the finger"
 Left Hand
Worked just as the Right Hand is, only the first 23 stitches will be split over 2 needles and will be the palm worked in STst. The following 23 stitches will be worked in pattern on a single needle. The schematic to the left shows the stitch by stitch representation of the finished product.
IMPORTANT: These gloves are not ambidextrous, you must remember to reverse the pattern.
Finishing
Use the tails between fingers to close up any gaps or holes.
Weave in all ends and cut yarn.
Pull out any lifelines or scrap yarn.
Notes:
Knitting font created by Aire River Design.
Yarn spun on a Schacht Matchless.
Thank you so much for your interest in my patterns. Most of my free patterns were efforts to learn to design and do not conform to industry standards for sizing or terminology. Enough people continue to knit from these designs that I am happy to leave these patterns up for people to use but I cannot offer any amendments or substantial support for them.
As with all my patterns, you are welcome to use these patterns for your own personal, non-commercial or charitable use. If you wish to sell items made from these patterns or teach classes using my patterns, please contact me. Please do not distribute this pattern in print or electronically or post this pattern to your own site or publication. If you wish to share this pattern, please send the person a link to my site.