People run pretty hot and cold, when it comes to the topic of charts. Personally, I'm a big fan of them, and when it comes to lace, I find it nearly impossible to work without a chart. If you saw my knitting notebooks, you'd see that, no matter how simple or complex, I always chart my lace patterns out. If you enjoy working from charts or if you ever need to create a chart for a pattern, you can produce good clean results with spreadsheet software like Excel. I've created several tutorials in the past, which you can access here. This tutorial will use some of the same techniques I've covered in Using Excel to design colorwork and Using Excel to aid in writing multi-sized patterns. If you haven't seen those tutorials and you aren't comfortable using a program like Excel, I suggest you browse them to get the basic concepts of working in Excel.
The lace
I've chosen a very simple lace stitch pattern, designed by Dorothy Reade, which I'm using in Donna Druchunas' upcoming book.
Here are the verbose instructions.
Multiple of 6+7
Foundation row: k1, *kbl, yo, ddc, yo, kbl, k1* repeat to end of row
Even numbered rows: Purl
Row 1: ssk, *yo, kbl, k, kbl, yo, ddc* to last 6 stitches, then, yo, kbl, k, kbl, yo, k2tog
Rows 3, 5, and 7: ssk, *yo, k3, yo, ddc* to last 6 stitches, then, yo, k3, yo, k2tog
Row 9 and 13: k1 *kbl, yo, ddc, yo, kbl, k1* repeat to end of row
Row 11: ssk, *yo, kbl, k, kbl, yo, ddc* to last 6 stitches, then, yo, kbl, k, kbl, yo, k2tog
These instructions could be compressed even further, as the foundation row, 9, and 13 are all identical and 1 and 11 are identical. Even so, I find it hard to use these instructions to visualize what I'm doing. I also find that it takes me longer to memorize a lace pattern if I can't see it charted out.
Set up your workspace
Select all the rows and cells in your Excel sheet and adjust the size of the cells to mimic the shape of a knit stitch. If need be, refer to the colorwork tutorial for more information on how to do this.
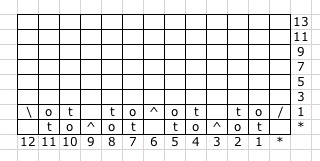
Based on the verbose instructions, I see that the +7 is made up of one stitch at the beginning of the row and 6 at the end and that there is a foundation row and 7 public side rows. Because I know this, I can number my rows and add grid lines.
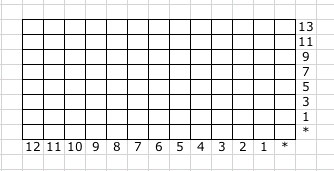
If you can't determine this from reading the instructions, just begin charting your lace, and go back add the row and stitch counts and your grid lines, later.
Inserting the first row of symbols
Foundation row: k1, *kbl, yo, ddc, yo, kbl, k1* repeat to end of row
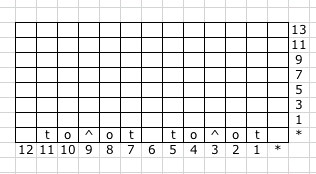
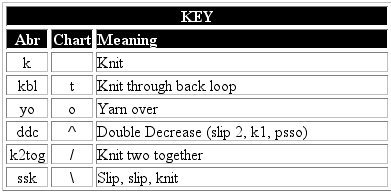
There is no need to download fancy schmancy knitting fonts. You can communicate with your standard set of characters. See the key above, to see how I've translated the stitches to letters. Use characters that will make sense to you. I like a blank stitch for knit, "t" for "twist," "o" for "yo," and slashes and a carrot for the decreases. Don't like that? Do something different. I won't hate.
The first row with a modified last repeat
Row 1: ssk, *yo, kbl, k, kbl, yo, ddc* to last 6 stitches, then, yo, kbl, k, kbl, yo, k2tog
The first row in which we have a reason for those extra 6 stitches at the end. While the main pattern repeat requires a double decrease, the first and last decreases of the row will be single decreases. You will be able to see this more clearly when we get to the end.
Convert remaining rows to chart format
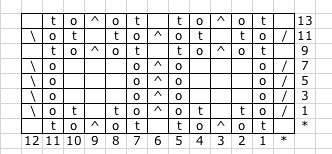
Complete the pattern as indicated in the verbose instructions. Whenever I can, I like to copy and paste, duplicate stitches and rows. Do whatever works best for you.
Double check your work, going stitch by stitch from text to chart.
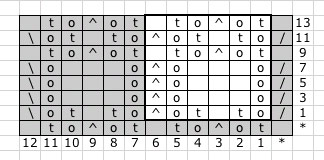
The end results are neat and clean, but would probably cause confusion. It's not clear where the pattern repeats begins and ends.
Outline the repeat
Select the stitches that make up the repeat. In some patterns, this is very intuitive based on how the pattern is written, but some patterns are harder to distill down to a repeat, especially those where the location of the repeat shifts for one area to another. Lucky for us, this pattern is expressly written to make the repeat obvious, it's everything between the two asterisks [*]
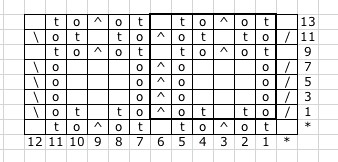
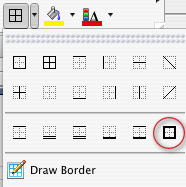
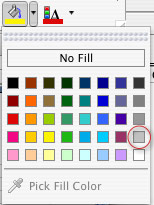
Just select the stitches you want to outline, and choose a thick border to outline it. You can choose a custom border by going to the FORMAT menu and choosing CELL.
Shading for clarity
Finally, to make the repeat really obvious, shade everything that only gets worked once per row. This makes the repeat really clear and visually indicates the secondary elements.
I think that you'll find that many lace and knit/purl stitch patterns can be worked up this way. Have fun with it.
In the next tutorial, I'll cover doing more complex lace charts and discuss the ever-confounding "no stitch."
Share this post
Comments (5)
Thank you! Your tutorials are best!
I'm definitely filing this one away for future use!
Posted by Arianne | September 11, 2007 7:20 AM
Posted on September 11, 2007 07:20
You make the best tutorials! I chart everything...it is so much easier to work from a chart! :)
Posted by Ruinwen | August 4, 2007 5:01 AM
Posted on August 4, 2007 05:01
Ohhh finally found tutorial what I was looking for all over the internet!
Thank you soooooooo much! You are my pattern saver!!! ;)
Thanks to Gudrun Johnston who gave me this link to here!
Posted by lillysmuul | August 4, 2007 3:08 AM
Posted on August 4, 2007 03:08
Excellent tutorial, very easy to follow. Thanks.
Posted by Jewels | August 3, 2007 6:41 PM
Posted on August 3, 2007 18:41
Marnie, you write the most easy to follow along with tutorials. Thank you!
Posted by loriz | August 3, 2007 4:47 PM
Posted on August 3, 2007 16:47