After an all morning meeting, my head is swimming but I was able to secure a spot on an earlier flight, so barring any unforeseen issues I should be back home before everyone is in bed. On the one hand, it'd be so nice to have a couple days to see Chicago, but on the other hand, I sure do love being home. I bet you can guess why.
Flying out was pretty turbulent with plenty of delays, but the view was grand.

Lovely Mt. Hood
I kept myself pretty entertained on the flight. First, I finished tatting that little flower design I was making.
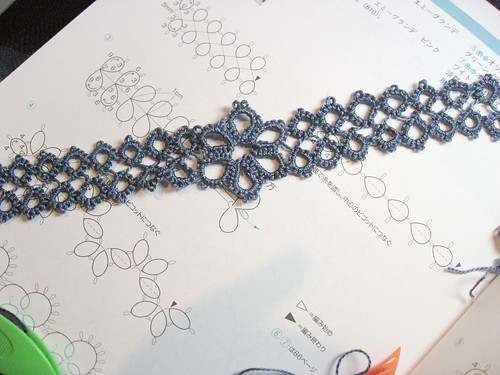
It's a simple choker based on a couple different motifs in my tatting book. I'll pick up some findings and finish it off, eventually.
I learned a lot working on this. I don't really have any need for a tatted choker, but forcing myself to create a project help me to perfect some of the techniques.
Once that was done, I started on a slightly more complicated border.
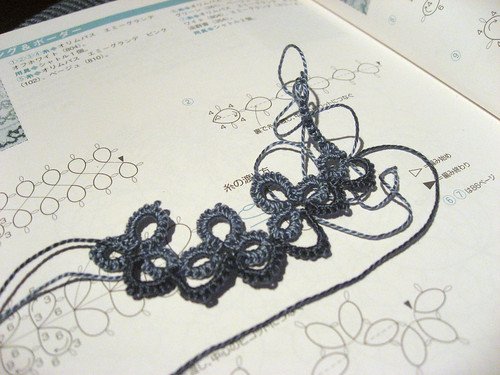
This version uses two different colors instead of the single color and single strand design of the choker.
By the end of the trip, I had created this
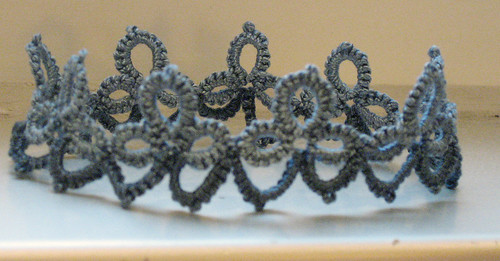
I think I want to use this as the top trim on a little evening bag, something just big enough to hold an ID, and some cash. Now I'm thinking I want more tatting books. Evil little craft.
The one thing I find a little challenging, right now, is starting a new thread, when the shuttle is empty. If any of you tatting experts have links to a good description, I'd love to know. It seems like the thicker the yarn, the harder it is to join a new thread, but that could just be my ignorance.
Share this post
Comments (17)
That's lovely! :)
Posted by Romi | March 5, 2008 11:34 PM
Posted on March 5, 2008 23:34
Nothing like a new obsession. The tatting looks great - now I'm fascinated too.
Posted by Delica | February 29, 2008 1:18 PM
Posted on February 29, 2008 13:18
Again you are so amazing! Your tatting is beautiful and I will resist the lure to lurn since I still haven't spun anything worth using. :)
Posted by Ruinwen | February 29, 2008 9:28 AM
Posted on February 29, 2008 09:28
That's really pretty--I'm impressed. Now I realize that the little handkerchief I received on my 21st birthday (from a relative in England) is edged in tatting. I always just considered it "lace". I'm really facinated with your work. Thanks for sharing.
Posted by Jennifer | February 29, 2008 8:12 AM
Posted on February 29, 2008 08:12
Wally's site has lots of good things (comment before me).
There are many ways to add a new thread and hide your ends as you go. I would not recommend knotting and then cutting the ends close. At least, not on anything you want to keep for posterity. Some people dab glue on the ends but it does discolor over time and it does leave a bump. The best place to add a new thread is at the end of a ring before you go to the next element. Leave 4-5 inches of your old thread (you'll trim later) and make a weaver's knot (Jane's site: http://www.e.n.e.btinternet.co.uk/WeaversKnot.htm - the loop with the new thread (red) and insert the tail (blue) of the old thread. Tighten new thread right up against the last ring and you'll feel a "pop" meaning it is secure. As you tat the next element, weave one of the tails into the tatting as you go. The other tail should be woven into the prior ring or chain with a crochet hook or you can sew it in. You'll find a way that works best for you. You only have to weave in for 3-4 stitches and then trim the excess off. It's best to wait until you close the ring before trimming - in case you have to open the ring to correct something else. There are other ways to add a new thread without a knot, but this is the easiest for now as a beginner.
:-)Gina
Posted by Gina | February 28, 2008 1:26 PM
Posted on February 28, 2008 13:26
Oh! A new tatter! I have been tatting since 1990 and each day I'm more in love with it. I also love Japanese Tatting books and have quiet a few. If you stumble on Ms. Fujito's books I recommend them. Lacis publish a collection, in English, of some of Fujito's patterns and also have very clear instructions to join a 2nd thread, to make split rings and chains, using a 3rd shuttle, etc. May be a little expensive but worth every penny!
Bob T. mentioned E-Tatters. I have been a member of it for a long time and it sure help. Now some people are making videos and posting them on You Tube and that's also great for beginners.
Oops... Sorry for the rambling. It's just that I get so excited when people still want to learn how to tat. I offer myself if you need help. Just drop a line or two, or visit my blog at http://needledreams2.multiply.com
Posted by NeedleDreams | February 28, 2008 8:28 AM
Posted on February 28, 2008 08:28
I stumbled across your site. Oh what memories tatting bring back to me of a lovely lady that was our neighbor as a child. She was from back East and she was very crafty...tatting was a wonderful thing she did that I was fascinated with. I would love to learn.
Beautiful things you are making.
Posted by Vonda | February 27, 2008 1:58 PM
Posted on February 27, 2008 13:58
I cannot be hooked on anything else - you must stop! I have been obsessively cross stitching that wonderful Norwegian-looking snowflake (if you remember it) from one of the Japanese craft books we bought in Portland. I have even invested in linen (though I'm still practicing on Aida cloth). You are evil! However, I have found some wonderful Japanese crochet and knitting books - stitch and motif dictionaries - so I will exact my revenge soon enough!
Posted by Julia | February 27, 2008 9:49 AM
Posted on February 27, 2008 09:49
Where might one find tatting kit?
I feel so strange. Never have I had ANY desire to do this. And now, after seeing what you make and reading of your ideas on how you plan on using the motifs to embellish knitting I really want to try it. You've opened ANOTHER world of possibilities. :)
Posted by Arianne | February 27, 2008 3:17 AM
Posted on February 27, 2008 03:17
Wah... so pretty! Mum said it looks like a tiara!
Posted by Ginger aka Beethoven | February 27, 2008 2:34 AM
Posted on February 27, 2008 02:34
There's a great community at http://etatters.ning.com/forum
I'm another one who overloads the shuttle. Most of the joining I have to do is because the thread snapped from wear while I was working it.
Posted by Bob T | February 26, 2008 7:10 PM
Posted on February 26, 2008 19:10
Funny you should ask how to join a new thread. I was a little obsessive and always overloaded my shuttle.
Your first project looks lovely. How are the finger callouses developing?
I think the only project that I had to join a new thread was my garter. I typically would of course never do it in the middle of a circle. It typically was done on the chain thread section. I would just wind on a new shuttle and go from there. Typically you don't need to hide the ends. If you do your knots tight enough, you will be able to just cut them short when the pattern is done.
Of my books, Tatting with Visual Patterns has the clearest examples and explanations. It has 4 different ways to conceal or join a new thread. 1) overlap a thread from ball or shuttle (best hint is that you do fewer knots to compensate for the thickness of holding the thread double for 3-4 stitches) 2) concealing the ends of a knot (this states that if the ends are short to using a sewing needle or crochet hook to pull the thread end through each half stitch you make until it has been tighted by 3-4 stitches) 3) using a weaver's knot to help conceal broken ends. 4) renewing a ball thread only by not tying a new knot and just running it doubled through a bit of the previous ring and then under the new chain stitches.
Another of my books has extremely detailed examples and explanations about how to conceal your ends and have a professional finish.
I will be in Portland to run errands on Thursday the 6th of March. I could meet with you to let you borrow my books. Just let me know.
Posted by Chrispy | February 26, 2008 3:50 PM
Posted on February 26, 2008 15:50
You really seem to have grasped the tatting and excelled (at least to my untrained eye, anyway!)
Posted by AmyP | February 26, 2008 3:27 PM
Posted on February 26, 2008 15:27
Sorry I missed you. Come back soon!
Posted by Linda in Chicagoland | February 26, 2008 2:27 PM
Posted on February 26, 2008 14:27
Look at you go :) Those are some nice pieces!
Posted by Kate | February 26, 2008 1:43 PM
Posted on February 26, 2008 13:43
ooooo sooo pretty...
Posted by mazhalai | February 26, 2008 1:16 PM
Posted on February 26, 2008 13:16
Ohhh very pretty! I got a book on tatting and was so excited...turns out it has pattern-type instructions, but no actual "instruction" or how to :( Gotta get another book!
Posted by Jenni | February 26, 2008 12:51 PM
Posted on February 26, 2008 12:51