While on Ravelry, the other day, the topic of charting cables came up and it occurred to me that I've covered using Excel for; colorwork, pattern writing, simple lace charts, and complex lace charts. But what's this? No cables? Have I been smokin' the wacky tobacky?
Now, cables can get pretty complicated, and there will be times when your design, just can't be visualized with the tools built into a spreadsheet program, but for pretty standard cables, I think I can cover what you need here.
As always, I start by formatting my page.
I've covered this in previous episodes, so browse those, if you aren't sure how to change the size of cells to be more knit stitch shaped.
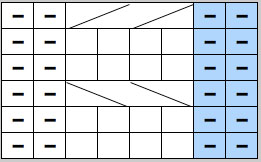
Our first cable is going to look like this.
This chart would read, if written out:
- Row 1: P2, *k4, p2* repeat from * to * to end of row
- Row 2: Knit the knits and purl the purls
- Row 3: P2, *slip next 2 stitches on cable needle and hold in front, k2, k2 from cable needle, p2* repeat from * to * to end of row
- Rows 4&5: Repeat row 2
- Row 6: P2, *slip next 2 stitches on cable needle and hold in back, k2, k2 from cable needle, p2* repeat from * to * to end of row
So those diagonal lines simply represent the stitches being crossed. They may not look exactly like other charted cables, but they convey the intention and the approximate look of the cable.
To start with, set your foundation row. I want my +2 stitches to be in blue, to clearly indicate that they are separate from the repeating pattern. I'll use en-dashes for purl stitches and blank squares for knit stitches.
Once the first row is completed, select it and either copy and paste it into the other 5 rows of the chart or use the auto fill option to drag the style and contents. Again, you can see previous tutorials for info on this step.
Once you've got the foundation of your chart built, select the left two cells of your cable.
Selected cells are highlighted in yellow, above.
Press CMND+1 (mac) or CTRL+1 (pc) to bring up the FORMAT CELL dialog box.
The FORMAT CELLS dialog box has several tabs. Make sure your window looks similar to this.
In the ALIGNMENT tab, click the MERGE CELLS box. This turns those two cells into one wide cell.
Next, go to the BORDER tab in the same dialog box.
In the BORDER tab, apply a border to the top, right, bottom and diagonal of those two merged cells.
Click OK
Copy and paste those two merged cells into the two cells to the left.
You are almost there. The only problem is the border between the two halves of the cable.
Keeping those left two cells selected (they are now merged into one,) go back to the FORMAT CELLS dialog box by typing CMND or CTRL+1
Turn off the border on the right hand side of the cell.
The first cable is completed. Now repeat the process for the next cable row, making sure you reverse the diagonal lines. You can either do this just as you did the first row, or copy and paste and adjust the borders as needed.
Perfect!
Other sorts of cables can be done in Excel too. If you are working on a twisted stitch design, you'll need to cross two stitches instead of four. Set up your foundation as you did before, then, wherever you plan to put the cable, select the stitches and go to your FORMAT CELLS dialog box. Don't merge the cells, just head on over to your BORDERS tab.
Turn on your top, bottom, left, right and diagonal borders, but turn off the border between cells.
Your borders will look like this.
And this is what you end up with.
Cables don't have to be over even numbers, either. Here's how you'd do a cable that crosses two stitches over one.
Set up your foundation and select the three cells that make up your cable
cross. Go to your borders and turn off the border between cells, so it looks
like the picture above.
Click OK
Click on the leftmost cell of the cable cross. Holding CMND (mac) or CTRL (pc) click on the rightmost cell of the cable cross.

Go back to your FORMAT CELLS dialog box.
Add the diagonal border to these two cells. Click OK.
And this is what you get. As you can see, it clearly indicates that two stitches are crossed in front of one stitch. Nifty.
There are quite a lot of cables you can create and different ways you can format the cables to make them easier to decipher. Try adding a heavier border or a border of a different color, if you think it will better convey your intentions.
I've uploaded the original Excel spreadsheet, so you can play with it. Download it by clicking here or clicking the picture below.
All the cells on the spreadsheet are gray unless you put content in them. Add a new cell by placing a space in any gray cell. The cell will turn white. You can see more about that here.
Share this post
Comments (11)
Hi Marnie,
I found your website as I was looking for Excel symbols to graph cables. I'm working on a sock pattern and was drawing a blank. And I work with Excel everyday. Shame on me. I can't thank you enough for sharing this tutorial! I'll be sure to reference your helpful post.
Posted by Beatriz | November 12, 2008 9:14 PM
Posted on November 12, 2008 21:14
I wont the Lily lace chart,it's possible
Posted by malusica | February 25, 2008 4:55 PM
Posted on February 25, 2008 16:55
Very good tutorial, thank you.
Posted by AmyP | February 16, 2008 9:30 AM
Posted on February 16, 2008 09:30
I use Excel to chart cables, but I use the knitting symbols font and that is a lot easier. You can download it free here:
http://www.knittinguniverse.com/xrx/DownloadsList.php?CategoryID=32
Posted by Diana | February 14, 2008 12:59 PM
Posted on February 14, 2008 12:59
Thanks Marnie. I have been looking for more lace tutorials aside from Eunny's and I had forgotten about yours. This is so helpful and very generous of you to do. Thanks again.
Posted by Wanett | February 14, 2008 11:40 AM
Posted on February 14, 2008 11:40
I was called an "Excel Samurai" at work yesterday.
I know hand that title to you. Wear it well.
Posted by Jasmin | February 14, 2008 9:18 AM
Posted on February 14, 2008 09:18
Thanks for posting this tutorial - I really enjoyed reading your Create-Along tutorials and this one is no different!
Posted by Cara | February 14, 2008 9:14 AM
Posted on February 14, 2008 09:14
Wow - thanks! I use Excel all the time for patterns and usually just write (cable 6 front) instead - because I didn't know you could do that!
Great tutorial!
Posted by Jody | February 14, 2008 7:28 AM
Posted on February 14, 2008 07:28
This is wonderful, like all of your tutorials, but does it mean that you didn't get out to see the city? Or did you just pop back into the hotel around 4:30 when it was -40 degrees and dark? I know it sounds sick, but in a weird way I miss it. Chicago is beautiful, and the weather weeds out the weak!
Posted by Julia | February 14, 2008 7:24 AM
Posted on February 14, 2008 07:24
Marnie, you've done it again! Your tutorials have heped me enormously, now I can actually document my designs.
You are a goddess!
Posted by Maria Näslund | February 14, 2008 3:19 AM
Posted on February 14, 2008 03:19
Wow you are fast.
A great tutorial.
Posted by chrispy | February 13, 2008 10:30 PM
Posted on February 13, 2008 22:30